When long-running tasks such as machine learning experiments finish, it is very useful to send notifications with the results to Slack. This article explains how to send text messages and images to Slack using Python, and also covers edge cases that are easy to overlook in production use — rate limiting, payload size limits, and the security risk of leaking a webhook URL — based on Slack’s official documentation.
On the scope of verification in this article: the setup steps and screenshots in Sections 1 and 2 (fig1–9) were captured by actually sending notifications to a real Slack workspace. The rate-limiting behavior (Section 3.1) and oversized-payload behavior (Section 3.2), however, are quoted from Slack’s official documentation rather than measured, because no test Slack workspace or webhook URL is available in the environment this article was written in. This distinction is called out explicitly below.
How Incoming Webhooks Work at the Protocol Level
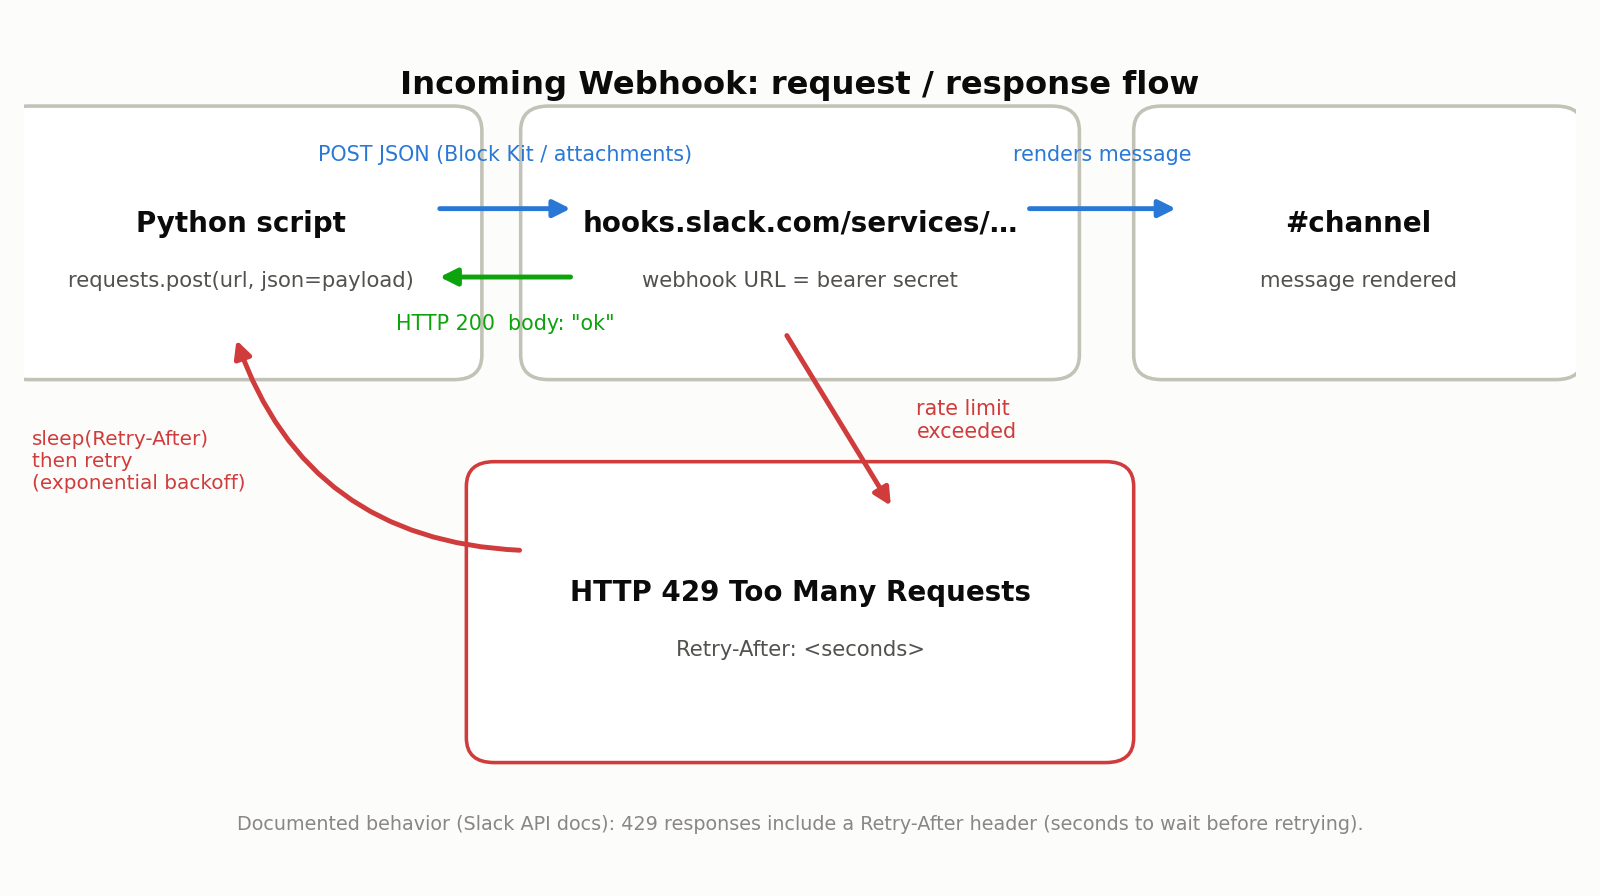
An Incoming Webhook lets you post a message simply by sending an HTTP POST request to a unique URL that Slack issues in advance (in the form https://hooks.slack.com/services/T000000/B000000/XXXXXXXXXXXXXXXXXXXXXXXX). The critical detail is that this URL itself is the credential. Unlike a regular Slack Web API call such as chat.postMessage, you don’t attach a separate token in an Authorization header — simply knowing the random string at the end of the URL path is treated by Slack as proof that you’re authorized to post to that channel. In other words, a webhook URL is “a bearer token embedded directly in an endpoint,” and leaking it lets a third party impersonate that integration and post arbitrary content (see Section 3.3).
The request/response shape is as follows:
- Request:
POST/Content-Type: application/json/ a JSON body whose top level hastext(a plain-text fallback),blocks(Block Kit layout array),attachments(legacy secondary-content array), or a combination of these - Success response:
HTTP 200with a body that is plain textok(not JSON) - Error response: an
HTTP 4xxstatus with a plain-text error code such asinvalid_payload,channel_not_found, orno_service - Rate-limit response:
HTTP 429 Too Many Requestswith aRetry-Afterheader (detailed in Section 3.1)
1. Sending Text (Incoming Webhook)
Incoming Webhooks are the simplest way to post messages to Slack from external applications. By sending an HTTP request to a specific URL, you can post messages to a designated channel.
Slack Configuration
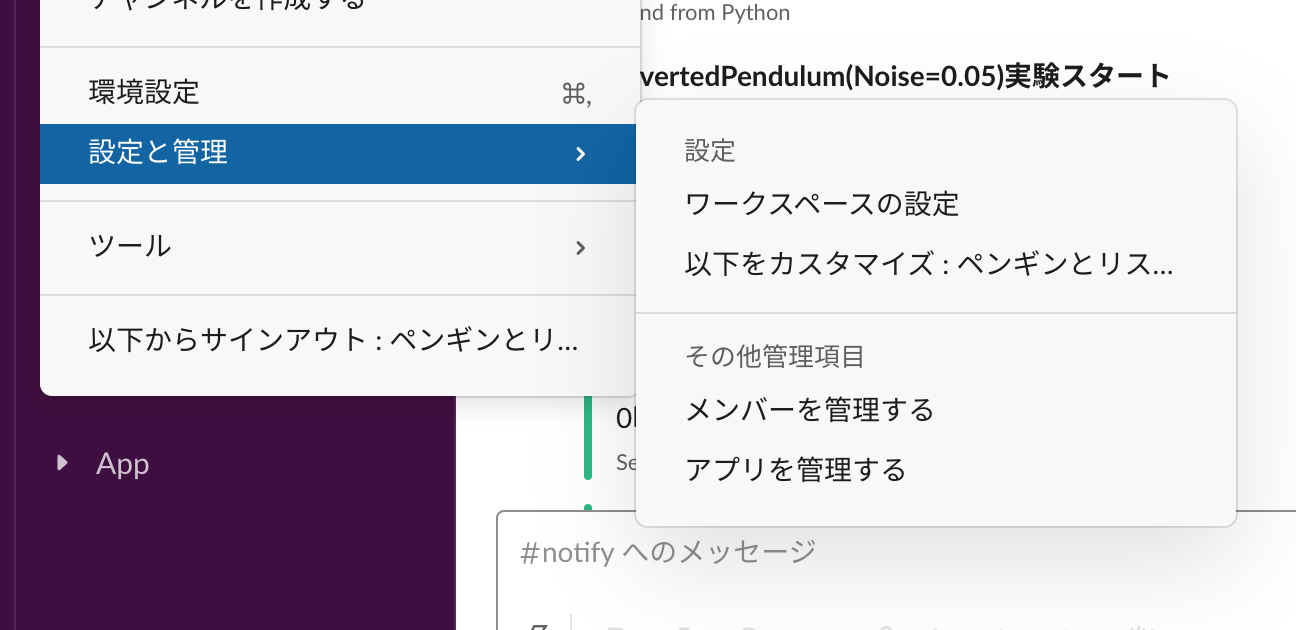
In Slack, go to “Settings & administration” and select “Manage apps.”
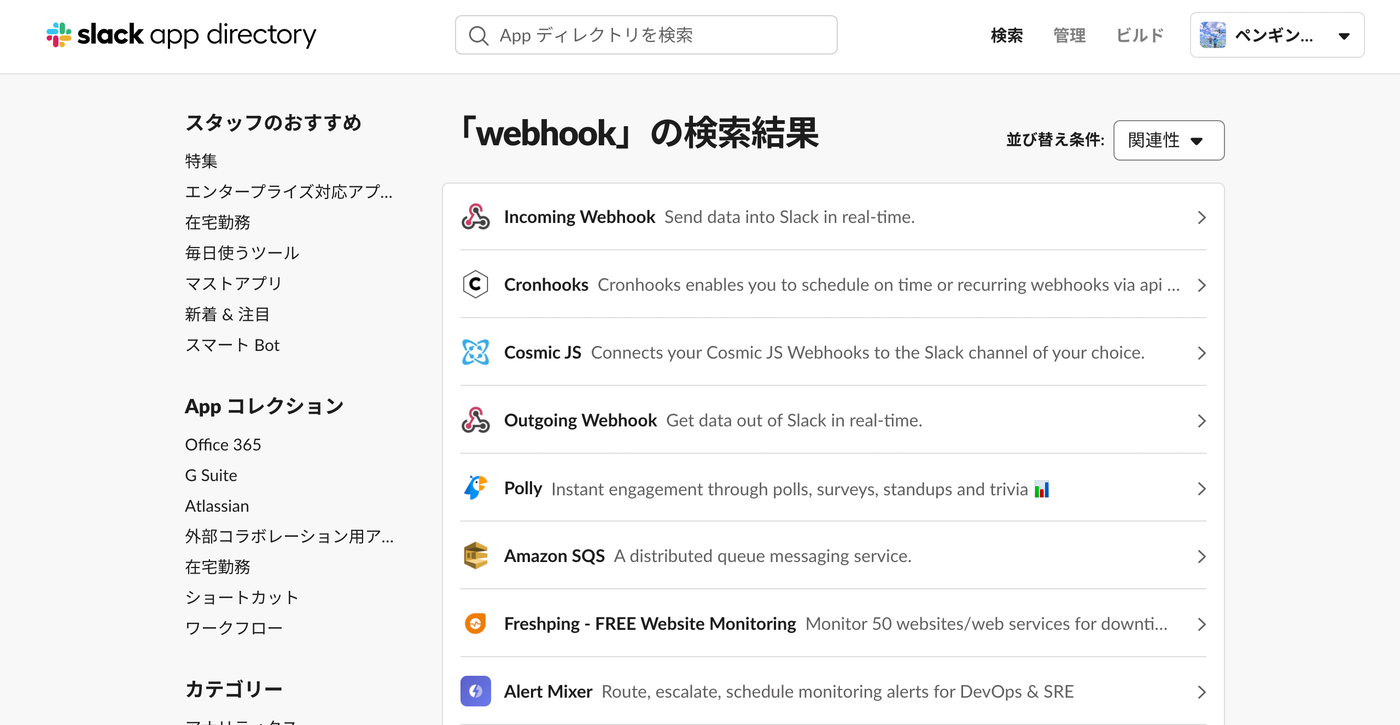
Search for “Incoming Webhooks” in the App Directory and add it to Slack.
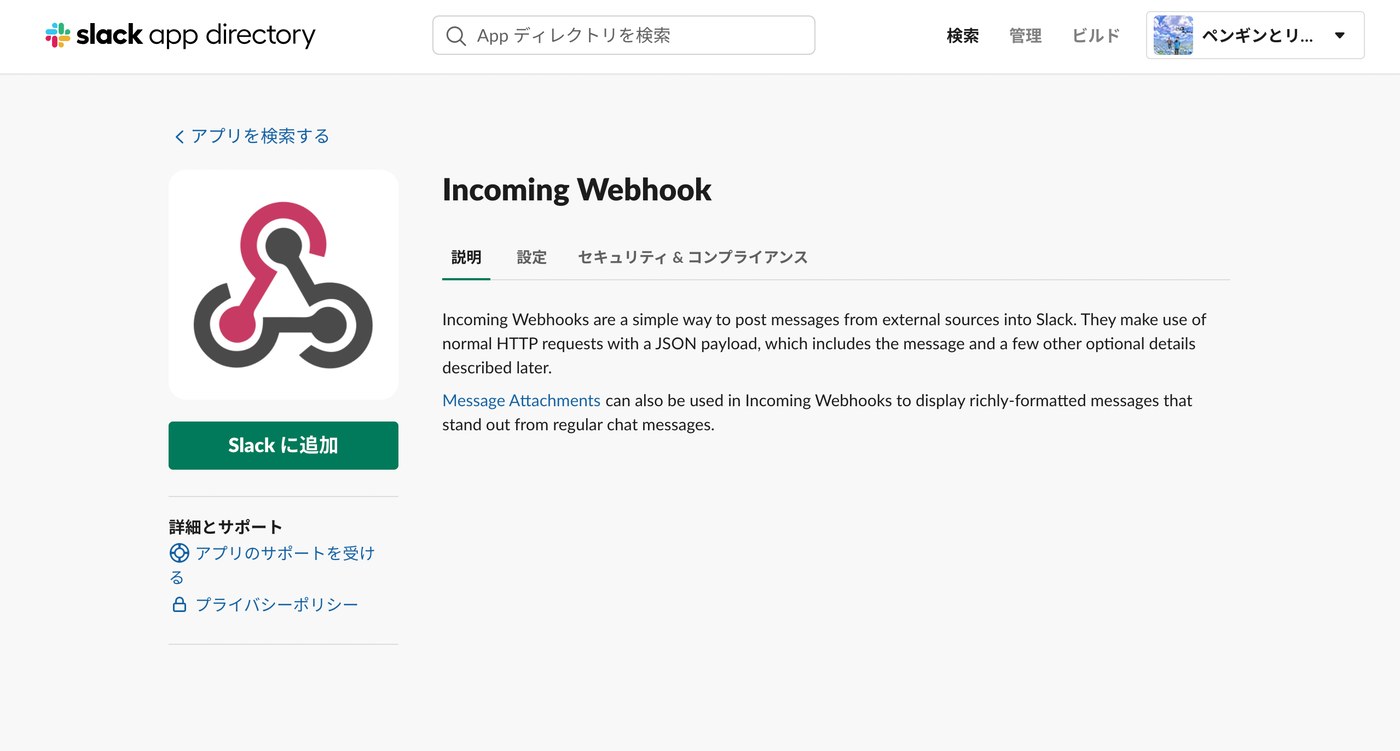
After clicking “Add to Slack,” select the channel where you want to post messages and click “Add Incoming Webhooks integration.”
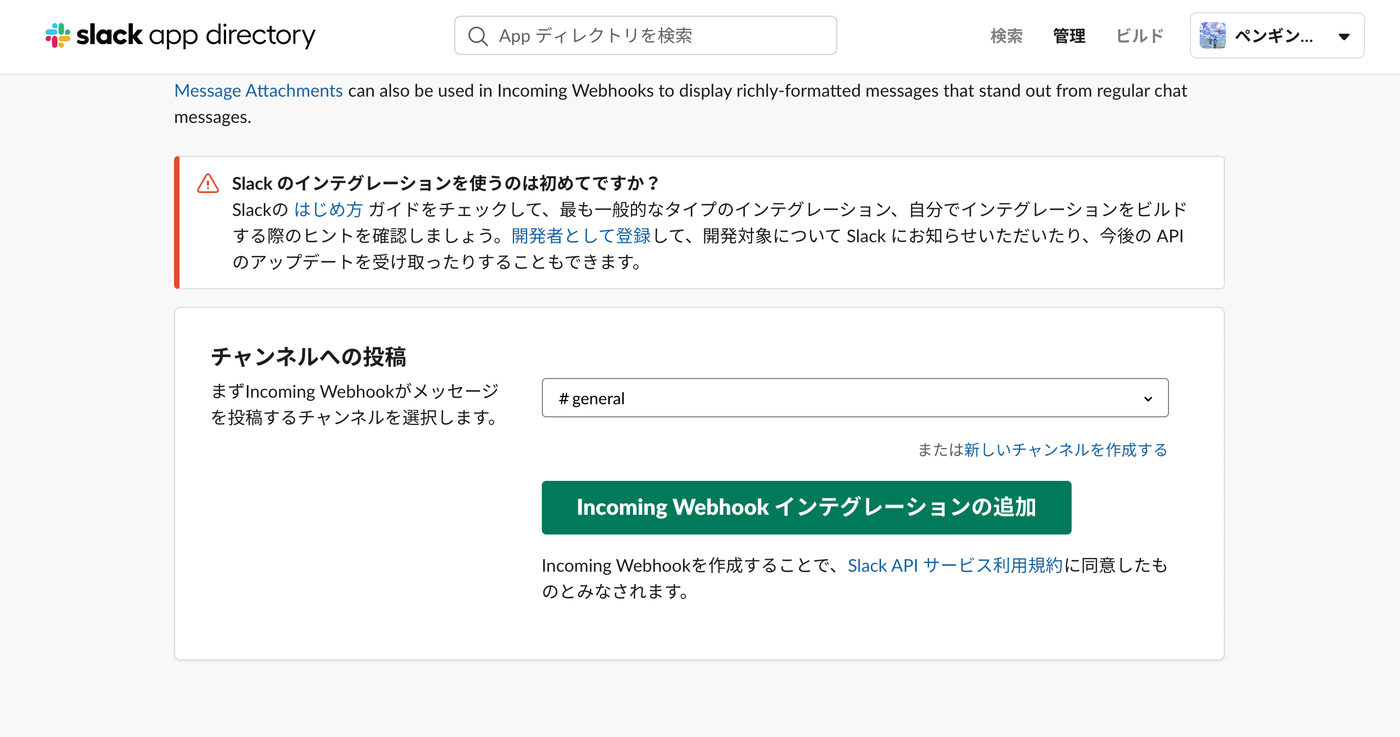
Copy the generated “Webhook URL.” Be careful not to expose this URL publicly.
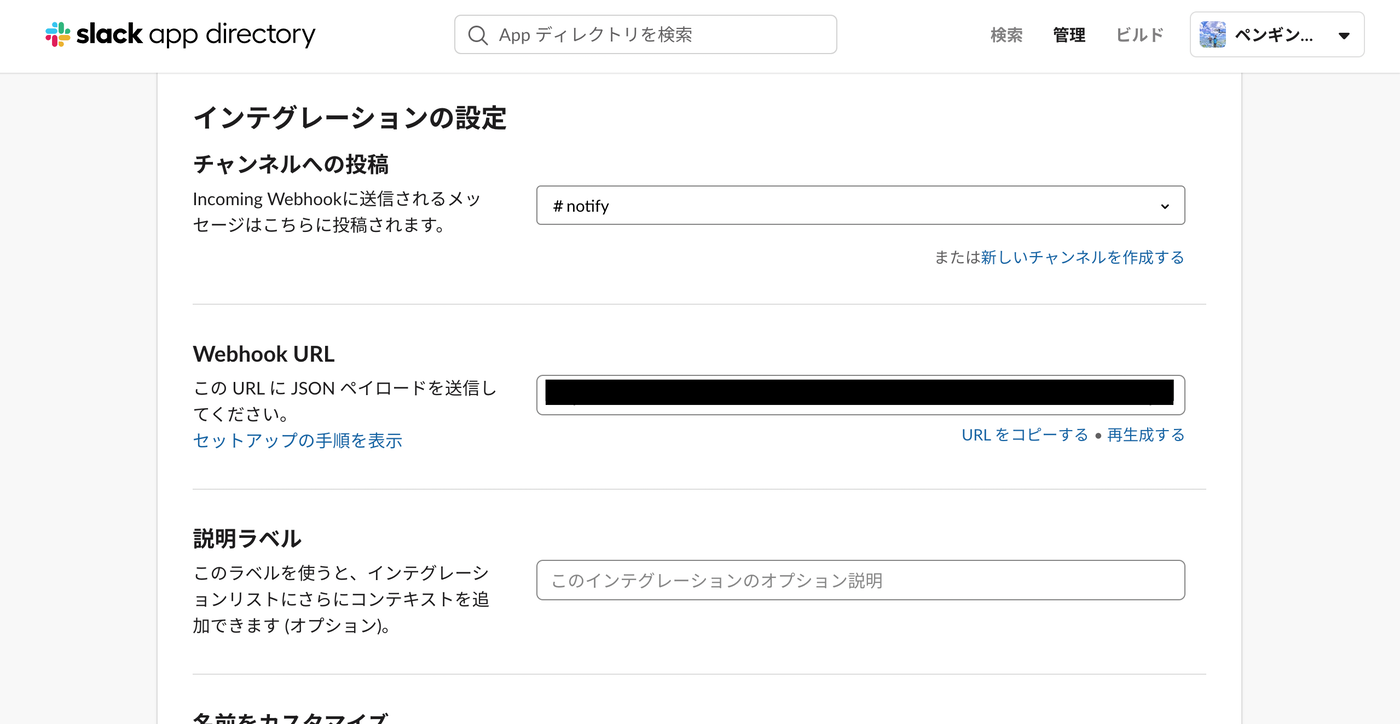
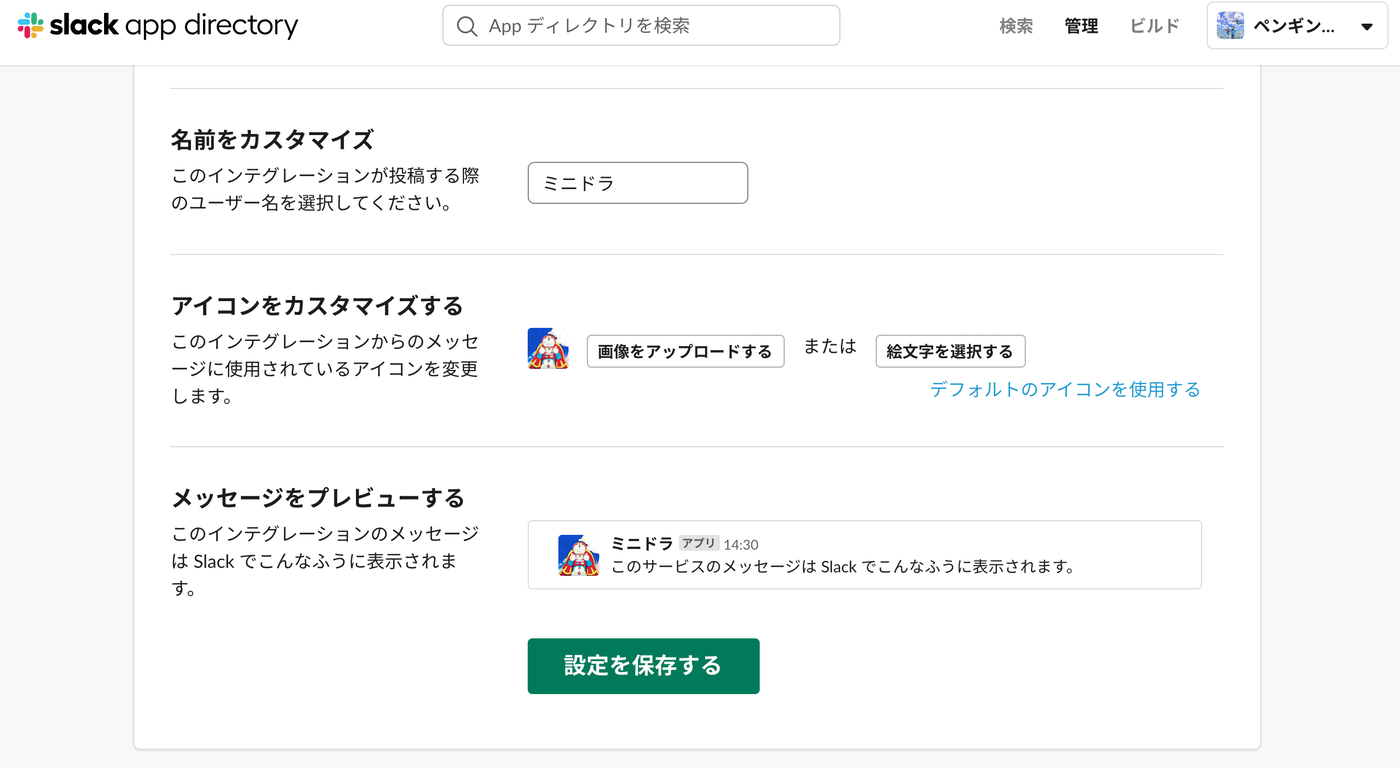
On the configuration page, you can also customize the notification icon and bot name.
Python Code
The slackweb library makes it easy to implement notifications.
pip install slackweb
import slackweb

# Set the Webhook URL copied from the configuration
slack = slackweb.Slack(url="YOUR_WEBHOOK_URL")

def notify_text(title, text, color):
    """
    Sends a text notification to Slack.

    :param title: Message title
    :param text: Message body
    :param color: Color of the left border ('good', 'warning', 'danger', or hex color code)
    """
    attachments = [{
        "title": title,
        "text": text,
        "color": color,
        "footer": "Sent from Python Script",
    }]
    slack.notify(attachments=attachments)

# --- Examples ---
notify_text("Experiment Complete", "Model A training finished.", "good")
notify_text("Warning", "Disk space is running low.", "warning")
notify_text("Error", "An exception occurred during training.", "danger")
- Note: Slack’s official documentation now positions
attachments-based formatting as “legacy.” It has not been formally declared deprecated, but the docs explicitly state that “these legacy options may be subject to reductions in visibility or functionality” going forward, and recommend Block Kit for new implementations (see Section 4).
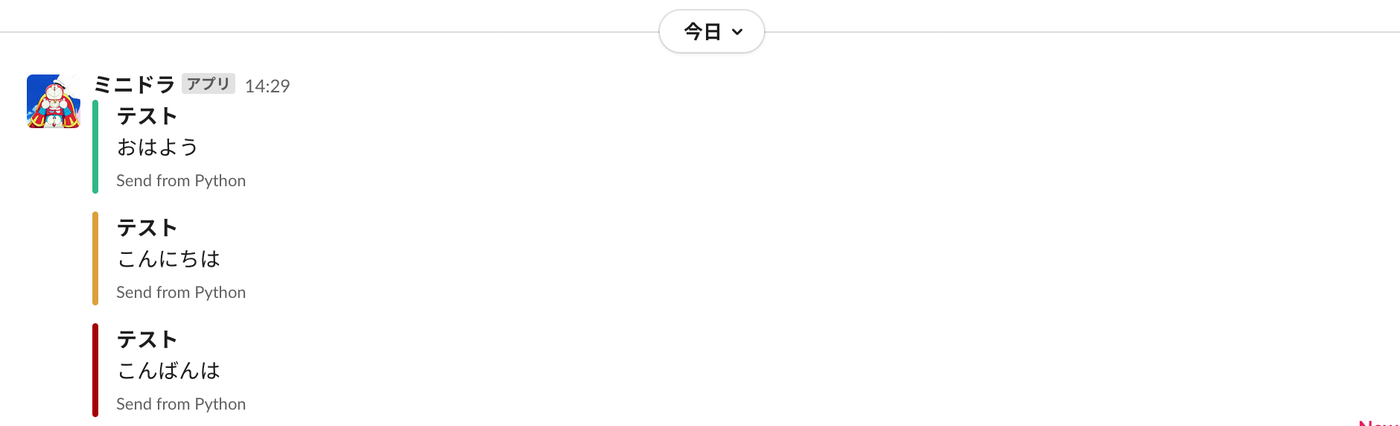
Result
The Current Recommended Approach: Block Kit
The attachments example above is kept in its legacy form so it matches the fig7 screenshot, but for new implementations it’s better to skip slackweb and POST a Block Kit JSON payload directly with requests — this is less exposed to future changes in the legacy format.
import requests

def notify_block_kit(webhook_url, title, text, emoji=":white_check_mark:"):
    """
    Sends a text notification to Slack using Block Kit (currently recommended).

    :param webhook_url: The Incoming Webhook URL
    :param title: Title shown as a header block
    :param text: Body text (mrkdwn format — supports *bold* and `code`)
    :param emoji: Slack emoji code prefixed to the text
    """
    payload = {
        "blocks": [
            {
                "type": "header",
                "text": {"type": "plain_text", "text": f"{title}", "emoji": True},
            },
            {
                "type": "section",
                "text": {"type": "mrkdwn", "text": f"{emoji} {text}"},
            },
        ]
    }
    response = requests.post(webhook_url, json=payload, timeout=5)
    response.raise_for_status()  # non-200 responses (e.g. 429) raise here
    return response

# --- Example ---
WEBHOOK_URL = "YOUR_WEBHOOK_URL"
notify_block_kit(WEBHOOK_URL, "Experiment Complete", "Model A training finished.")
2. Sending Images (files.upload API → files_upload_v2)
To send image files such as experiment result graphs, you need a different authentication credential (an API token) than Incoming Webhooks, together with Slack’s file-upload functionality.
Important API change (2024–2025): The
files.uploadmethod originally shown in this article, according to Slack’s official changelog, could no longer be used by newly-created Slack apps as of May 16, 2024, and was fully retired for all apps, including existing ones, on November 12, 2025. That means the earlierrequests.post(url="https://slack.com/api/files.upload", ...)implementation no longer works as of the time this article was updated (2026). The official replacement is a two-step call tofiles.getUploadURLExternalandfiles.completeUploadExternal, and the Python SDK (slack_sdk) provides a convenience wrapper for this calledfiles_upload_v2. The code below has been updated to this current approach.
Slack Configuration
- Go to the Slack API site and create a new app under “Create New App.”
- Navigate to “OAuth & Permissions” in the app management page.
- In the “Scopes” section under “Bot Token Scopes,” add the “
files:write” scope. This grants the app permission to upload files. - Click “Install to Workspace” at the top of the page to install the app and authorize it.
- After installation, the “Bot User OAuth Token” will be displayed. Copy this token (it usually starts with
xoxb-). Keep this token secure and do not expose it publicly. - Note the channel ID (e.g.
C0123456789, not a name like#general) of the target channel ahead of time.files_upload_v2only accepts channel IDs, not channel names.
Python Code
Install and use the official Python SDK (slack_sdk).
pip install slack_sdk
import os
from slack_sdk import WebClient
from slack_sdk.errors import SlackApiError

# Load the Bot User OAuth Token from an environment variable — never hardcode it (see Section 3.3)
client = WebClient(token=os.environ["SLACK_BOT_TOKEN"])

def notify_image(channel_id, title, image_path):
    """
    Uploads an image to Slack (files_upload_v2 version).

    :param channel_id: Target channel ID (e.g., 'C0123456789'; '#name' is not accepted)
    :param title: Image title
    :param image_path: File path of the image to upload
    """
    try:
        response = client.files_upload_v2(
            channel=channel_id,
            file=image_path,
            title=title,
        )
        return response["file"]
    except SlackApiError as e:
        raise RuntimeError(f"Upload failed: {e.response['error']}") from e

# --- Example ---
CHANNEL_ID = "C0123456789"  # Target channel ID
IMAGE_FILE_PATH = "test.png"  # Image to send

notify_image(CHANNEL_ID, "Training Results Graph", IMAGE_FILE_PATH)
- Note: Internally,
files_upload_v2automates three steps:files.getUploadURLExternal(issue an upload URL) → PUT the file contents →files.completeUploadExternal(signal completion). This means more round trips than the old single-requestfiles.upload, but it’s designed to upload large files more reliably.
Result
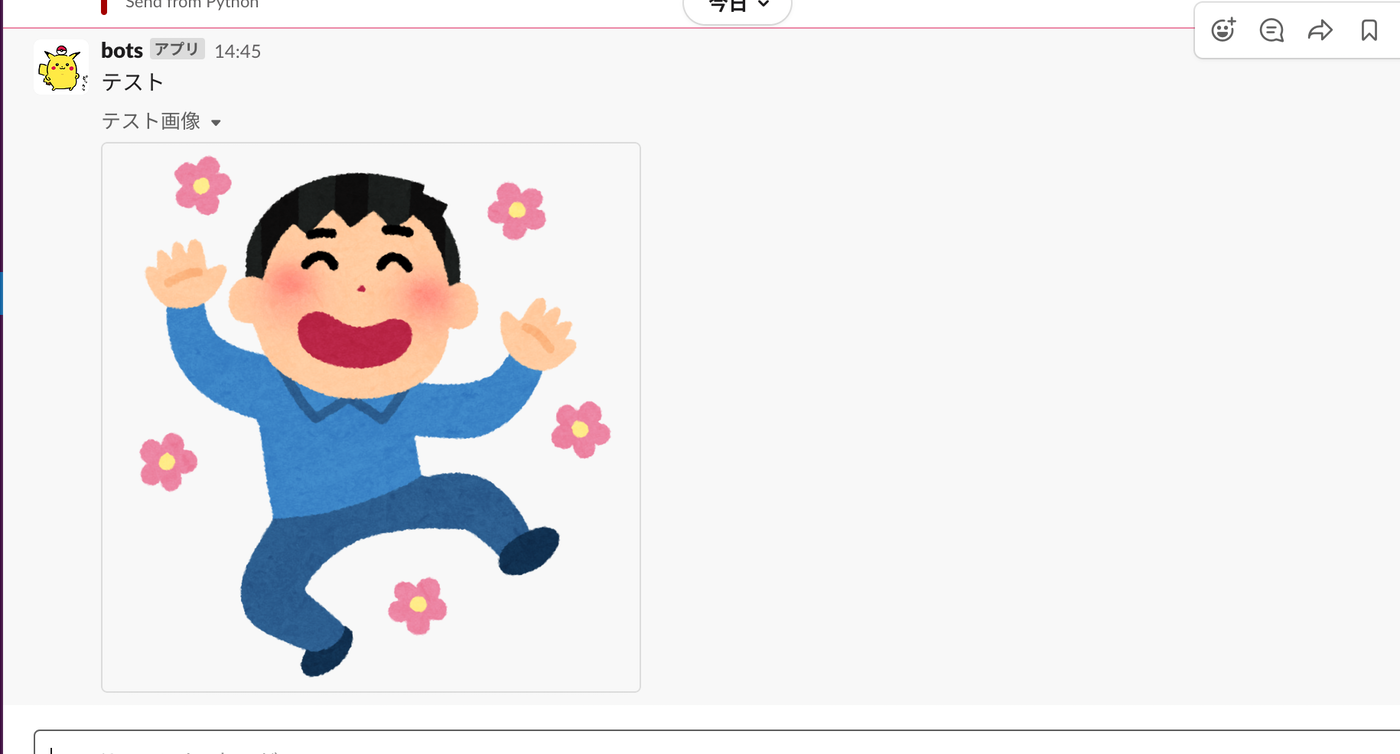
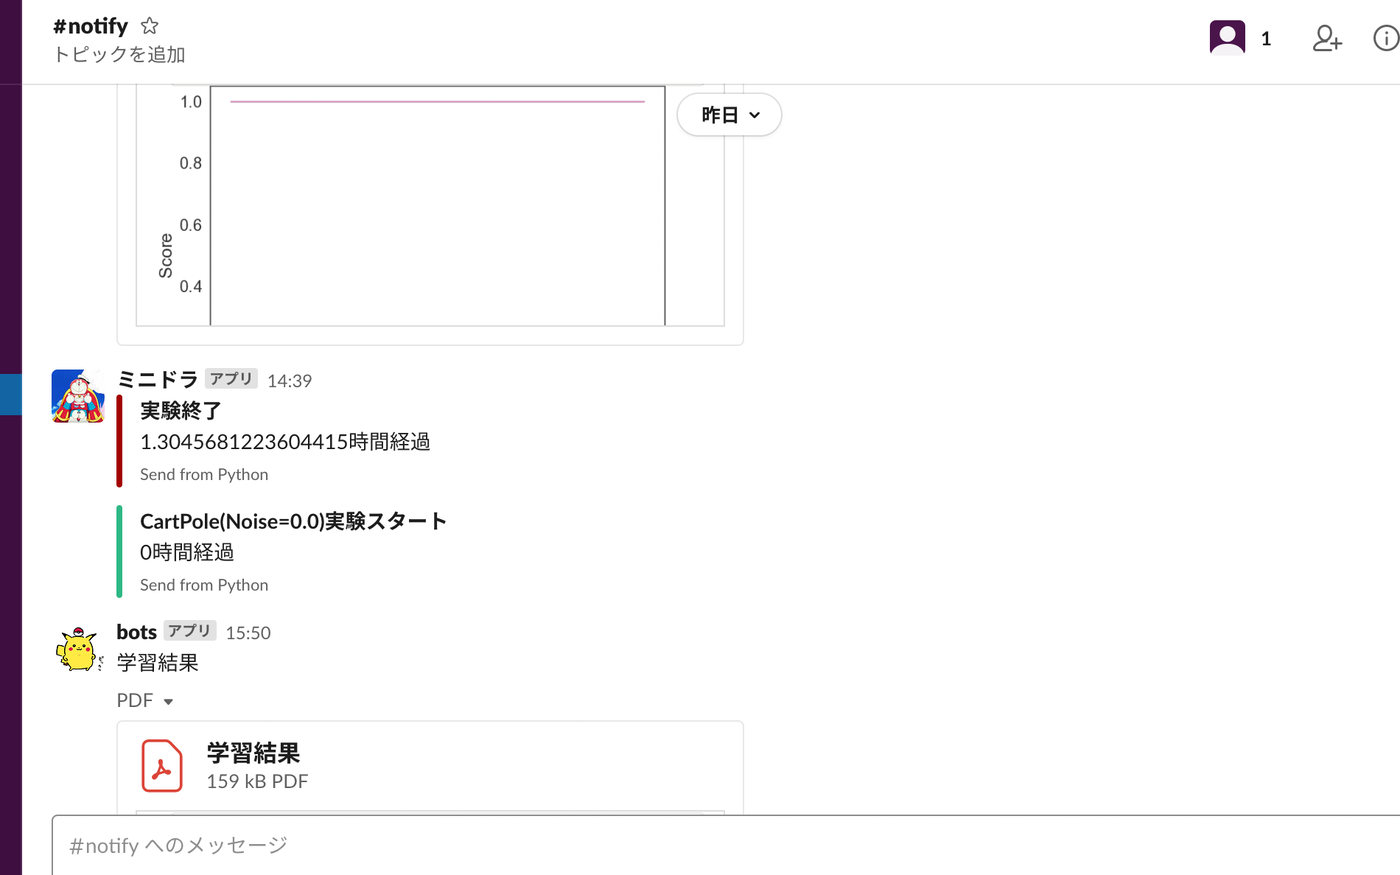
(The screenshots above were captured using the old files.upload flow, but the appearance in the Slack channel is unchanged when using files_upload_v2.)
3. Operational Edge Cases
Notifications at the frequency of a single “experiment finished” ping rarely hit any limits, but for CI/CD pipelines or monitoring systems that send notifications more frequently or in bulk, the following constraints matter. The figures in this section are based on Slack’s official documentation as of July 2026; this article’s working environment has no test Slack workspace or webhook URL available, so the rate-limiting and oversized-payload behavior below has not been measured against a live Slack API. Always check the official documentation for current figures before implementing.
3.1 Rate Limiting
According to Slack’s official rate-limits documentation, Incoming Webhooks are restricted to “1 request per second” per channel, with short bursts of more than one request tolerated to some degree. Exceeding this limit produces a response like:
HTTP/1.1 429 Too Many Requests
Retry-After: 30
The Retry-After header carries the number of seconds to wait before the next request. Code that sends bulk notifications should honor this header as its standard retry strategy.
import time
import requests

def notify_with_retry(webhook_url, payload, max_retries=3):
    """
    Sends a notification to an Incoming Webhook with retries.
    On HTTP 429, waits for the number of seconds in the Retry-After header,
    plus an additional exponential-backoff factor based on the attempt count,
    before retrying.

    :param webhook_url: The Incoming Webhook URL
    :param payload: The JSON payload to send (Block Kit/attachments)
    :param max_retries: Maximum number of retry attempts
    """
    for attempt in range(max_retries):
        response = requests.post(webhook_url, json=payload, timeout=5)
        if response.status_code == 200:
            return response
        if response.status_code == 429:
            retry_after = int(response.headers.get("Retry-After", "1"))
            wait_sec = retry_after * (2**attempt)
            time.sleep(wait_sec)
            continue
        response.raise_for_status()  # any other non-200 raises here
    raise RuntimeError(f"Failed to notify Slack after {max_retries} retries.")
3.2 Payload Size Limits
- The
textfield of a message is truncated by Slack beyond 40,000 characters. This is the current limit after a series of reductions rolled out through 2018 (originally 500,000, then 200,000, then 100,000, finally settling at 40,000 characters). In practice, staying to a few thousand characters is safer to avoid rendering issues. - When using legacy
attachments, a single message is capped at 20 attachments, thefooterfield is capped at 300 characters, and attached images are automatically shrunk once they exceed 360px width or 500px height. - Message text beyond roughly 700 characters or 5+ line breaks gets collapsed behind a “Show more” link in the Slack UI.
Exceeding these limits generally does not produce an HTTP error — Slack silently truncates or collapses the content instead. As noted above, this article has not verified the actual response for an over-limit payload; treat the figures above as documented specification, not measured behavior.
3.3 Webhook URL Leakage as a Security Risk
An Incoming Webhook URL is, by itself, the credential. If this URL is embedded in front-end JavaScript or accidentally committed hardcoded into a public GitHub repository, anyone who obtains it can post arbitrary content to that channel (they cannot read channel content, but impersonation and phishing abuse are both possible).
This is not a purely theoretical risk. In April 2024, GitHub added a “validity check” (verifying whether a leaked URL is still live) to its Secret Scanning detection for Slack webhooks. The fact that a dedicated detection-and-validation feature exists reflects that accidental commits of Slack webhook URLs to public repositories are a recognized, recurring real-world problem.
Standard mitigations:
- Store it in an environment variable or secret manager, never hardcoded in source or committed to a repository (in production, replace the
"YOUR_WEBHOOK_URL"placeholders in this article’s code with something likeos.environ["SLACK_WEBHOOK_URL"]) - Never embed it in client-side (browser) code. If the URL is reachable from code that runs in a browser, it is effectively public
- Call it through a server-side proxy. The front end calls your own backend API, and the backend holds the webhook URL and forwards the request to Slack
- Revoke and regenerate immediately if leaked. Regenerating the URL from Slack’s “Incoming Webhooks” configuration screen instantly invalidates the old one
4. Recent Developments: Block Kit vs. Legacy Attachments
The attachments-based formatting used in Section 1 is explicitly labeled “legacy” on Slack’s official “Legacy secondary message attachments” documentation page. It has not been formally deprecated, but the docs state plainly that “these legacy options may be subject to reductions in visibility or functionality” in the future, and strongly recommend
Block Kit
layout blocks (blocks) for new implementations. attachments and blocks can be combined in the same message — in that case, the blocks nested inside attachments are treated as secondary supplementary content.
This article’s code intentionally keeps the legacy format to match the real screenshot (fig7), but for new implementations, use the Block Kit version of notify_block_kit introduced in Section 1.
Related Articles
- Creating 3D Animations (GIFs) with Python Matplotlib - Learn how to create graphs with Matplotlib that you can send to Slack as experiment results.
- Matplotlib Practical Tips: Creating Publication-Quality Figures - Improve the quality of experiment result graphs sent to Slack.
- GitHub Actions Basics - Useful reference for sending Slack notifications from CI/CD pipelines.
- Introduction to Python Async: asyncio Basics and Practice - Async processing fundamentals for efficiently sending bulk notifications.
References
Official Documentation
- Rate limits | Slack Developer Docs - Incoming Webhook rate limit (1 request/second) and the 429 response format
- Legacy secondary message attachments | Slack Developer Docs
- Legacy status of
attachmentsand its limits (max 20, 300-char footer, etc.) - Truncating really long messages | Slack
- History of the 40,000-character
textfield limit - The files.upload method is retiring | Slack Developer Docs
-
files.uploadretirement (November 12, 2025) and its replacement APIs - Block Kit | Slack - The currently recommended message format
- Secret scanning changes to detection and validation for Slack | GitHub Changelog - GitHub’s validity check for leaked Slack webhook URLs