July 2026 full rewrite: This article originally covered Python environment setup with “pyenv + Anaconda” as of 2021. That information is largely obsolete today. This is a complete rewrite based on primary sources as of July 2026, including the official uv documentation , Python’s own venv docs, the pyenv README, and conda/Miniforge.
“Environment setup” for Python development actually bundles together three distinct problems under one phrase: which Python interpreter to use (version management), how to isolate libraries per project (virtual environments), and how to record and reproduce dependencies (package/project management). The original 2021 article solved these with a combination of pyenv (version management) and Anaconda (a distribution bundling virtual environments and package management together).
As of 2026, this picture has changed substantially. A single Rust-based tool called uv now covers all three problems at high speed and has effectively become the de facto standard. This article walks through uv as the core solution, the current role of pyenv, venv, and conda, when to use each, and a migration path for readers of the old article — all grounded in official documentation.
1. The Big Picture of Python Environment Setup in 2026
Separating three distinct problems
| Problem | What it manages | Traditional representative tool |
|---|---|---|
| ① Version management | Which Python interpreter (3.11, 3.14, etc.) to use | pyenv |
| ② Virtual environments | Where to isolate libraries per project | venv, virtualenv, conda |
| ③ Package/project management | Recording, resolving, and reproducing (locking) dependencies | pip, pip-tools, Poetry |
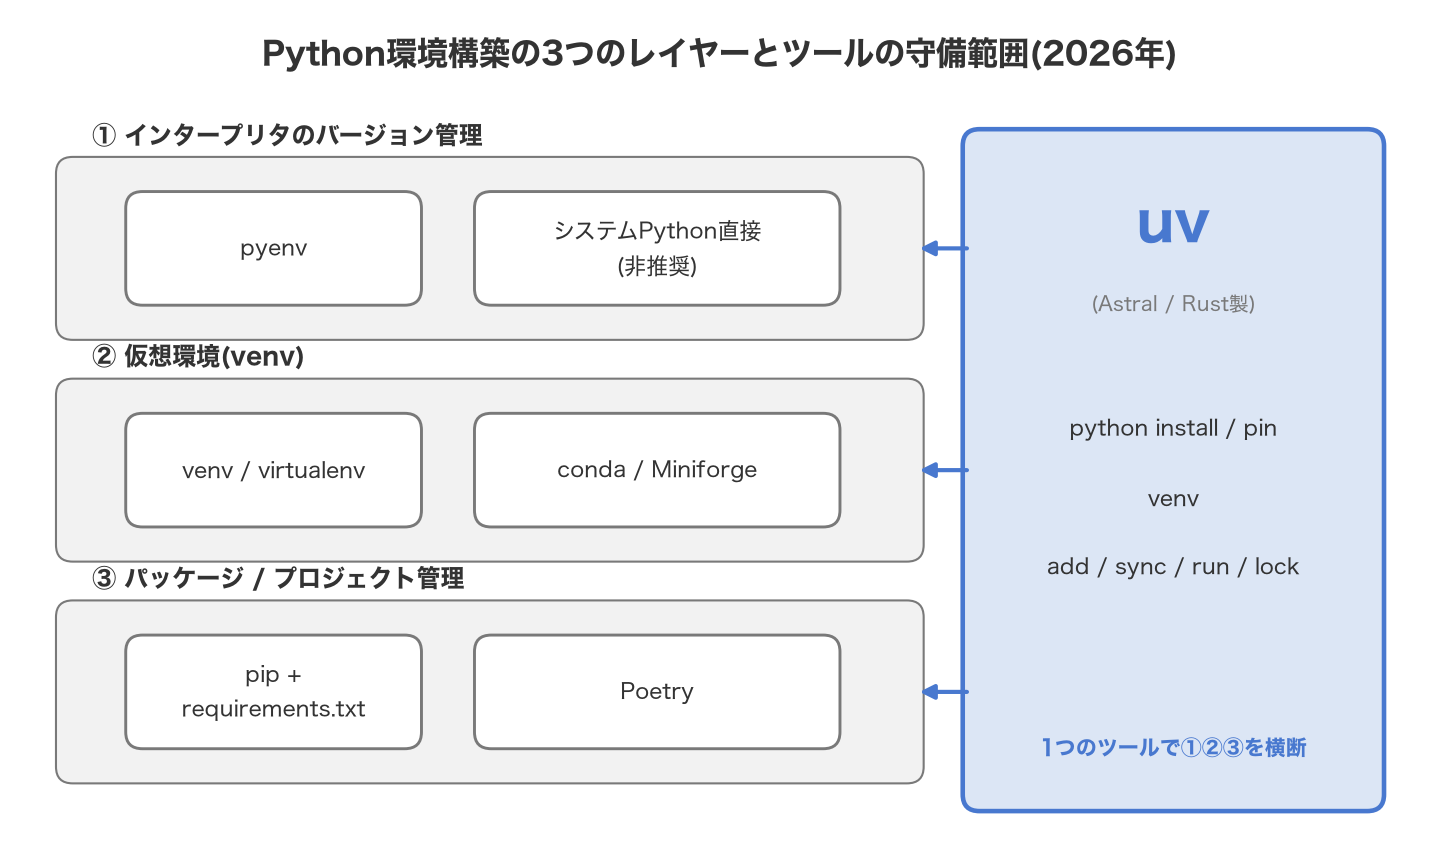
Anaconda was a “distribution” that bundled ② and ③ together, while pyenv was a “version management tool” that handled only ①. As of 2021, delegating ① to pyenv and ②③ to Anaconda was a reasonable combination.
What has changed
In February 2024, Astral — known for Rust-based tools like Ruff — released uv. It initially appeared as a fast drop-in replacement for pip, but quickly expanded in scope. In August 2024, the Rye project (an all-in-one tool developed by Armin Ronacher aiming for unified tooling) came under Astral’s stewardship, and by 2025 Rye’s development had ended, with users officially directed to migrate to uv (see the Rye migration guide ). Through this process, uv absorbed pip, pip-tools, pipx, virtualenv, and even pyenv-equivalent Python version management into a single binary.
Separately, since 2024 Anaconda Inc. has tightened commercial licensing for the Anaconda Distribution, requiring a paid contract for organizations with 200 or more employees or contractors. In response, many universities and companies have started recommending a move to Miniforge (maintained by the conda-forge community), a BSD-licensed, free alternative.
The result, as of 2026, is a de facto standard that converges on: “use uv unless you have a specific reason not to; combine it with conda (Miniforge) for GPU/scientific computing workloads with heavy native dependencies.” The rest of this article walks through each tool in turn.
2. What Is uv — An Integrated Tool Built by Astral in Rust
uv is a Rust-based Python package and project manager developed by Astral. The official documentation describes it as replacing “pip, pip-tools, pipx, poetry, pyenv, twine, virtualenv, and more.” As of this writing (July 2026), the latest version is 0.11.29 (released July 15, 2026).
Key characteristics:
- Speed: Dependency resolution and installation are dramatically faster than traditional pip (the official docs claim “10-100x faster”)
- Single binary: Runs as a single Rust-compiled executable and can be installed even in environments without Python already present
- Broad scope: Python version management, virtual environments, pip-compatible package installation, pyproject.toml-based project management, and one-off script execution — all in one tool
Installation (macOS / Linux)
The official standalone installer is the simplest option.
# Official installer (curl)
curl -LsSf https://astral.sh/uv/install.sh | sh

# Pin to a specific version
curl -LsSf https://astral.sh/uv/0.11.29/install.sh | sh

# Via Homebrew
brew install uv

# Via pipx / pip (if you already have a Python environment)
pipx install uv
After installation, run uv --version to confirm. Because uv works standalone without disrupting existing projects, it’s easy to try alongside your current tooling and adopt it incrementally.
3. Python Version Management with uv
The role pyenv used to play — switching between multiple Python versions — is now integrated into the uv python subcommand.
# Install a specific Python version
uv python install 3.12

# Install multiple versions at once
uv python install 3.11 3.12 3.14

# List available and installed versions
uv python list

# Pin the Python version for the current directory (generates .python-version)
uv python pin 3.12
uv python pin creates a .python-version file in the current directory. When running a command, uv walks up from the current directory (and its parents) looking for .python-version, falling back to a user-level configuration directory if none is found. This mechanism is compatible with pyenv’s own .python-version file, which makes migrating from an existing pyenv setup relatively smooth.
Python versions managed by uv are installed under ~/.local/share/uv/python/, with minor-version executables (e.g., python3.12) placed on ~/.local/bin. This design avoids polluting the OS-provided or Homebrew-installed Python, much like pyenv does.
4. Project Management with uv — init / add / sync / run
The other pillar of uv is project management built on pyproject.toml and a lockfile (uv.lock), roughly equivalent to what Poetry provided.
# Create a new project (in a dedicated directory)
uv init my-project
cd my-project

# Add a dependency (automatically updates pyproject.toml and uv.lock)
uv add requests
uv add "requests==2.31.0"        # pin a version
uv add "django>=5.0" --group dev  # add to the dev dependency group

# Remove a dependency
uv remove requests

# Sync the virtual environment to match the lockfile exactly
uv sync

# Run a script/command in the project environment (verifies lock integrity before running)
uv run python main.py
uv run pytest
The generated pyproject.toml is where humans edit project metadata and dependency requirement ranges. uv.lock, on the other hand, is a cross-platform lockfile that records dependencies resolved down to exact versions — it should not be edited manually and should be committed to version control (Git). This lets team members and CI environments reproduce an identical dependency environment just by running uv sync.
# Example pyproject.toml
[project]
name = "my-project"
version = "0.1.0"
requires-python = ">=3.12"
dependencies = [
    "requests>=2.31.0",
]

[dependency-groups]
dev = [
    "pytest>=8.0.0",
]
uv run checks lockfile integrity every time it runs a command and re-syncs the environment automatically if needed, greatly reducing how often you need to manually run source .venv/bin/activate.
5. When to Use the Traditional Tools
Just because uv covers all three problems doesn’t mean pyenv, venv, and conda have become obsolete. Each still has a place.
pyenv — where it still makes sense
- Your company or team has already standardized on pyenv, and the migration cost isn’t justified
- You need to work with a special Python implementation or patched build that uv doesn’t support
- Because pyenv’s
.python-versionis also compatible with uv, you can useuv python installwhile keeping the version-switching workflow itself in pyenv’s style
venv + pip — when you want to stick to the standard library
Python has shipped the venv module in its standard library since version 3.3. If you don’t want to add any external tooling, or you’re teaching with Python’s own built-in mechanisms only, this remains a valid choice.
python3 -m venv .venv
source .venv/bin/activate
pip install requests
That said, dependency locking (i.e., reproducibility) then relies on the fairly rudimentary pip freeze > requirements.txt approach, which is not as rigorous as uv’s lockfile.
conda / Miniforge — its role in native dependencies and scientific computing
conda’s strength — one that neither uv nor pip has — is that it manages not just Python packages but native dependencies beyond the scope of Python packaging, such as CUDA toolkits, MKL, and various precompiled C libraries. For GPU-based deep learning environments, or projects requiring geospatial/numerical libraries like GDAL, conda’s binary package management remains a practical solution.
Since the Anaconda Distribution’s commercial licensing was tightened for organizations with 200+ people starting in 2024, as of 2026 it’s safer to choose Miniforge — a BSD-licensed, free, minimal installer defaulting to the conda-forge channel.
Comparison table
| Tool | Version mgmt | Virtual env | Package mgmt | Primary use (2026) |
|---|---|---|---|---|
| uv | Yes | Yes | Yes | Default choice for new projects |
| pyenv | Yes | No | No | Maintaining existing setups, special implementations |
| venv (stdlib) | No | Yes | pip only | Zero-dependency setups |
| conda / Miniforge | Yes (bundles Python too) | Yes | Yes | GPU / native-dependency-heavy scientific computing |
| Poetry | No | Yes | Yes | Continuing existing projects (uv recommended for new ones) |
6. Recommended Setups by Use Case
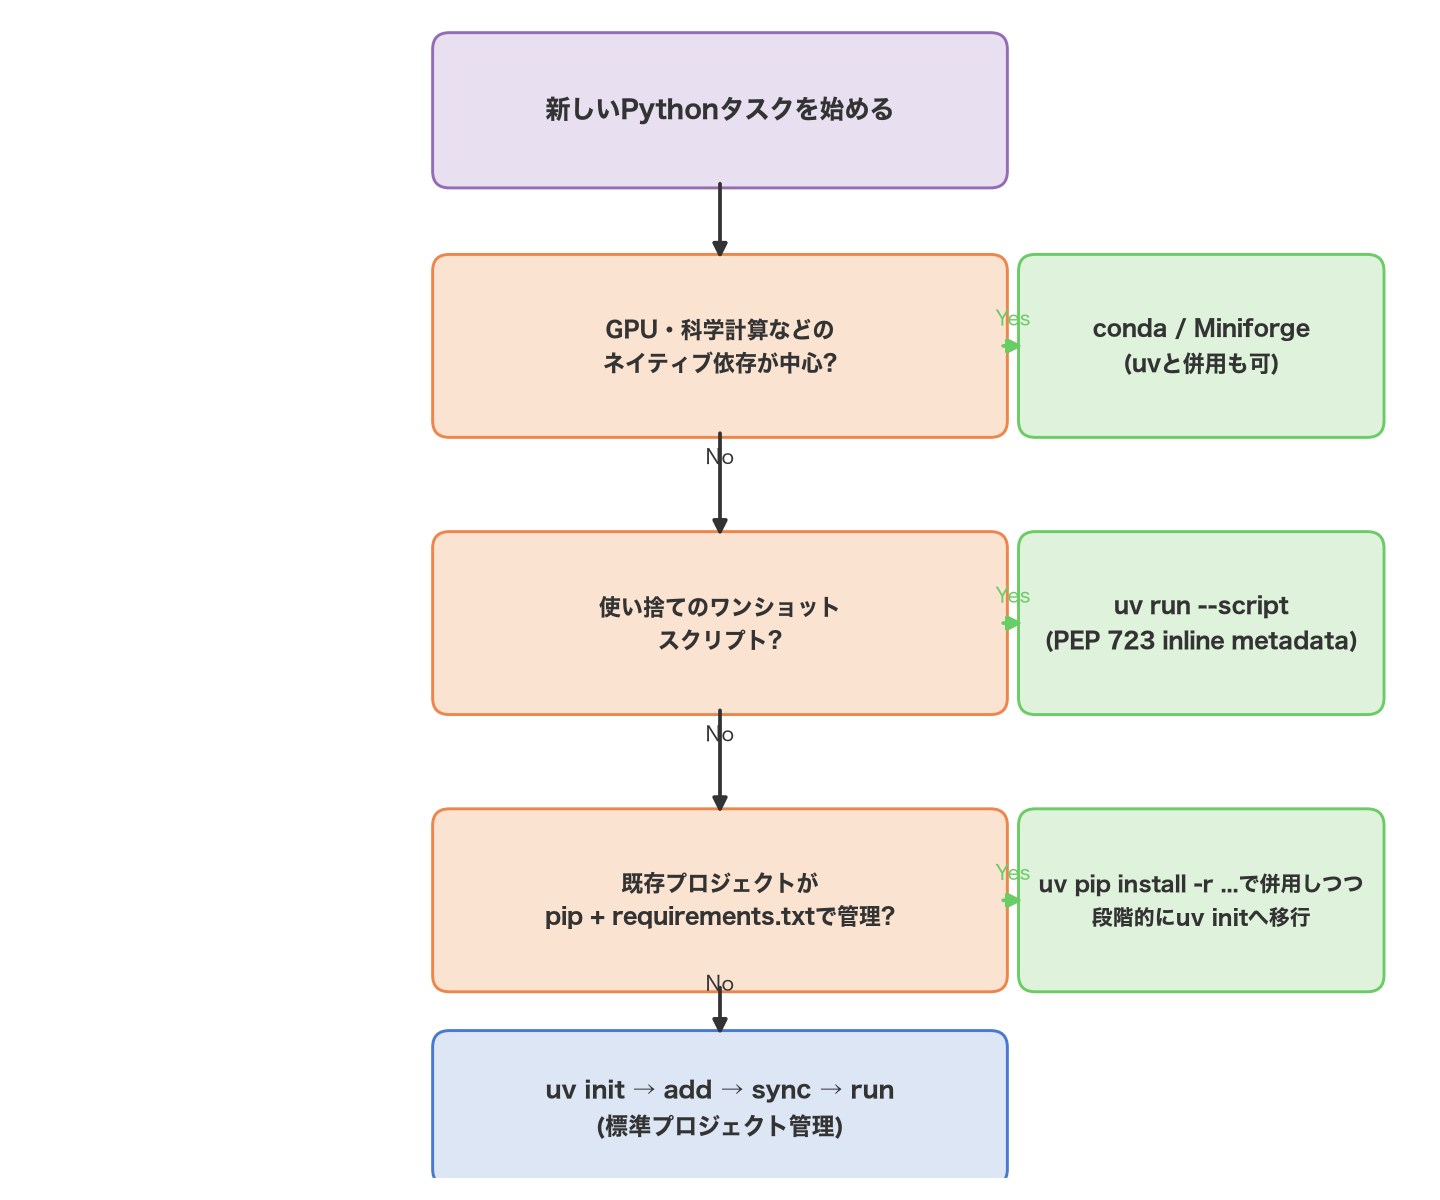
Figure 2: Decision flowchart for selecting a Python environment tool by use case
New projects
Start with uv init, and complete the workflow with uv add / uv sync / uv run. Just committing pyproject.toml and uv.lock to Git lets your whole team and CI reproduce the exact same dependency environment.
Existing pip-managed projects (requirements.txt)
uv also provides a pip-compatible interface, so you can migrate without immediately converting to pyproject.toml.
uv venv
uv pip install -r requirements.txt
Once you’ve confirmed things work, consider gradually migrating to uv add-based project management as time allows.
Data analysis
If your workload is purely Python packages (pandas, matplotlib, etc.), uv alone is fast enough to build the environment. Once you need libraries with heavy native dependencies like GDAL, consider bringing in conda alongside it.
Machine learning (GPU)
When CUDA/cuDNN and other native dependencies are involved, conda/Miniforge remains a strong option. That said, uv also supports specifying CUDA build indexes for PyTorch (uv add torch --index ...), so uv alone may suffice depending on your use case. Judge based on the complexity of your dependencies.
Disposable scripts
For a single-file verification script, combining
PEP 723
inline script metadata with uv run --script is convenient.
# /// script
# dependencies = [
#   "requests<3",
#   "rich",
# ]
# ///

import requests
from rich import print

print(requests.get("https://example.com").status_code)
uv run script.py
Because dependencies are embedded at the top of the script itself, uv run alone automatically sets up an isolated environment with the necessary dependencies — no separate requirements.txt or virtual environment needed. You can also append dependencies via a dedicated command.
uv add --script script.py "requests<3" "rich"
7. Migrating from pyenv + Anaconda
For readers of the original 2021 article, or anyone who has long relied on a pyenv + Anaconda setup, here is a migration path to uv.
- Install uv (via the curl one-liner or Homebrew shown above). It can coexist with your existing pyenv and Anaconda installations, so there’s no need to remove anything right away.
- Switch to uv on a per-project basis. If a project root already has a
.python-versionfile, you can reuse it as-is. Create a virtual environment withuv venv, then runuv pip install -r requirements.txt(or, if a Poetry pyproject.toml exists, re-register dependencies withuv add) and verify everything works. - Run both in parallel for a while, confirming there are no issues across CI and production environments as well.
- Be careful when uninstalling Anaconda. If you had set Anaconda as your global environment via pyenv (
pyenv global anaconda3-x.x.x), carefully check your shell initialization script (.zshrc, etc.) for leftover PATH entries so they don’t interfere with other tools’ path resolution. Anaconda’s uninstaller often doesn’t fully remove thebaseconda environment — you may need to manually delete.condarcand the~/anaconda3directory itself. - Whether to retire pyenv entirely is optional. Because of its compatibility with
.python-version, you can keep pyenv installed while gradually shifting actual version installation and switching over to uv — a gradual migration that fits your team’s pace.
8. Summary
Python environment setup in 2026 has converged almost entirely on uv as the default choice, absent a specific reason otherwise. uv covers three distinct problems — version management, virtual environments, and package/project management — with a single, fast, Rust-based tool.
Figure 1: The three layers of Python environment setup and each tool’s scope of coverage
That said, pyenv still has a place in maintaining existing workflows and managing special Python implementations; venv + pip suits scenarios where you want zero external dependencies; and conda/Miniforge remains relevant for managing native dependencies in scientific computing and GPU workloads. Rather than “one universal tool has arrived, so retire everything else,” the practical conclusion as of 2026 is to use uv as your baseline while combining traditional tools where appropriate.
Frequently Asked Questions (FAQ)
Can uv handle everything on its own?
In most cases, yes. uv covers version management, virtual environments, and package/project management all together, and for a new project you can go from uv init all the way to uv run in one continuous flow. That said, when native dependencies beyond the scope of Python packaging — such as CUDA toolkits — are involved, there’s still room to consider combining it with conda/Miniforge (see Chapters 5 and 6).
Is Anaconda no longer necessary?
For general Python development, it’s safe to consider it unnecessary. Even for data science or machine learning use cases where you want a bundled set of scientific computing packages, given the tightened commercial licensing for Anaconda since 2024, it’s safer to choose the BSD-licensed, free Miniforge instead (see Chapters 1 and 5).
Can uv and pyenv be used together?
Yes. Because uv’s .python-version file follows the same format as pyenv’s, you can keep your existing pyenv workflow in place while gradually shifting the actual version installation and switching over to uv (see Chapters 3 and 7).
Is requirements.txt no longer used?
For new projects, pyproject.toml + uv.lock is recommended. That said, uv provides a pip-compatible interface (uv pip install -r requirements.txt), so you can continue operating an existing project on requirements.txt for the time being. Migrating to uv add-based management gradually, when time allows, is the practical approach (see Chapter 6).
References
- Astral (2026). uv Documentation. https://docs.astral.sh/uv/
- Astral (2026). uv: Installation. https://docs.astral.sh/uv/getting-started/installation/
- Astral (2026). uv: Installing Python. https://docs.astral.sh/uv/guides/install-python/
- Astral (2026). uv: Python versions (.python-version and managed Python layout). https://docs.astral.sh/uv/concepts/python-versions/
- Astral (2026). uv: Working on Projects (init/add/sync/run). https://docs.astral.sh/uv/guides/projects/
- Astral (2026). uv: Running Scripts (PEP 723 inline metadata). https://docs.astral.sh/uv/guides/scripts/
- Astral (2026). uv: Using tools (uvx / uv tool install). https://docs.astral.sh/uv/concepts/tools/
- Astral (2026). uv GitHub Releases (v0.11.29, 2026-07-15). https://github.com/astral-sh/uv/releases
- pyenv contributors. pyenv README. https://github.com/pyenv/pyenv
- conda-forge community. Miniforge. https://github.com/conda-forge/miniforge
- Peterson, B. (2022). PEP 723 – Inline script metadata. https://peps.python.org/pep-0723/
- astral-sh/rye. Rye README and migration to uv. https://github.com/astral-sh/rye