If you’re tired of typing your username and password (or a Personal Access Token) every time you push or pull from GitHub, or if you’re stuck staring at “Permission denied (publickey)” and can’t connect at all, SSH is the fix. This post is a complete, one-stop guide: creating an Ed25519 key, configuring ~/.ssh/config, verifying the connection, managing multiple accounts, and diagnosing the most common errors. It follows GitHub’s current official documentation, so whether you’re setting up SSH for the first time or you got stuck years ago with an RSA key, working through it in order will get you connected without guesswork.
1. Why SSH Instead of HTTPS?
GitHub supports two main connection methods: HTTPS and SSH. Let’s compare them before diving in.
| Item | HTTPS | SSH |
|---|---|---|
| Authentication | Personal Access Token (or via Git Credential Manager) | Public-key authentication (key pair) |
| Repeated input | Token entry/caching can get tedious | No input needed after initial setup (ssh-agent holds the key) |
| Port | 443 (passes through most proxies/firewalls) | 22 (sometimes blocked) |
| Best suited for | Restrictive corporate networks, temporary use in CI | Personal dev environments, day-to-day development |
The short answer: for developers who use GitHub daily, SSH is the better default. Once you register a key, git push and git pull complete without any credential prompts, and you avoid dealing with expiring tokens or copy-paste mistakes. That said, in environments where port 22 is blocked (some corporate networks), HTTPS is the more reliable choice, so pick based on your environment.
2. How SSH Keys Work, in a Minute
SSH authenticates you to GitHub using public-key cryptography. Understanding the mechanism precisely will make the troubleshooting section later much easier to follow.
- The private key (e.g.,
~/.ssh/id_ed25519) stays on your local machine only — never share it. - The public key (e.g.,
~/.ssh/id_ed25519.pub) is registered with GitHub. As the name suggests, it’s fine for this one to be public. - When you connect, GitHub sends a random string (a challenge) to the client. The client signs it with the local private key, and GitHub verifies that signature against the registered public key. If the signature checks out, GitHub knows you hold the corresponding private key, and authentication succeeds.
At no point does the private key itself travel over the network — only a one-time signature, proof generated on the spot, is exchanged.
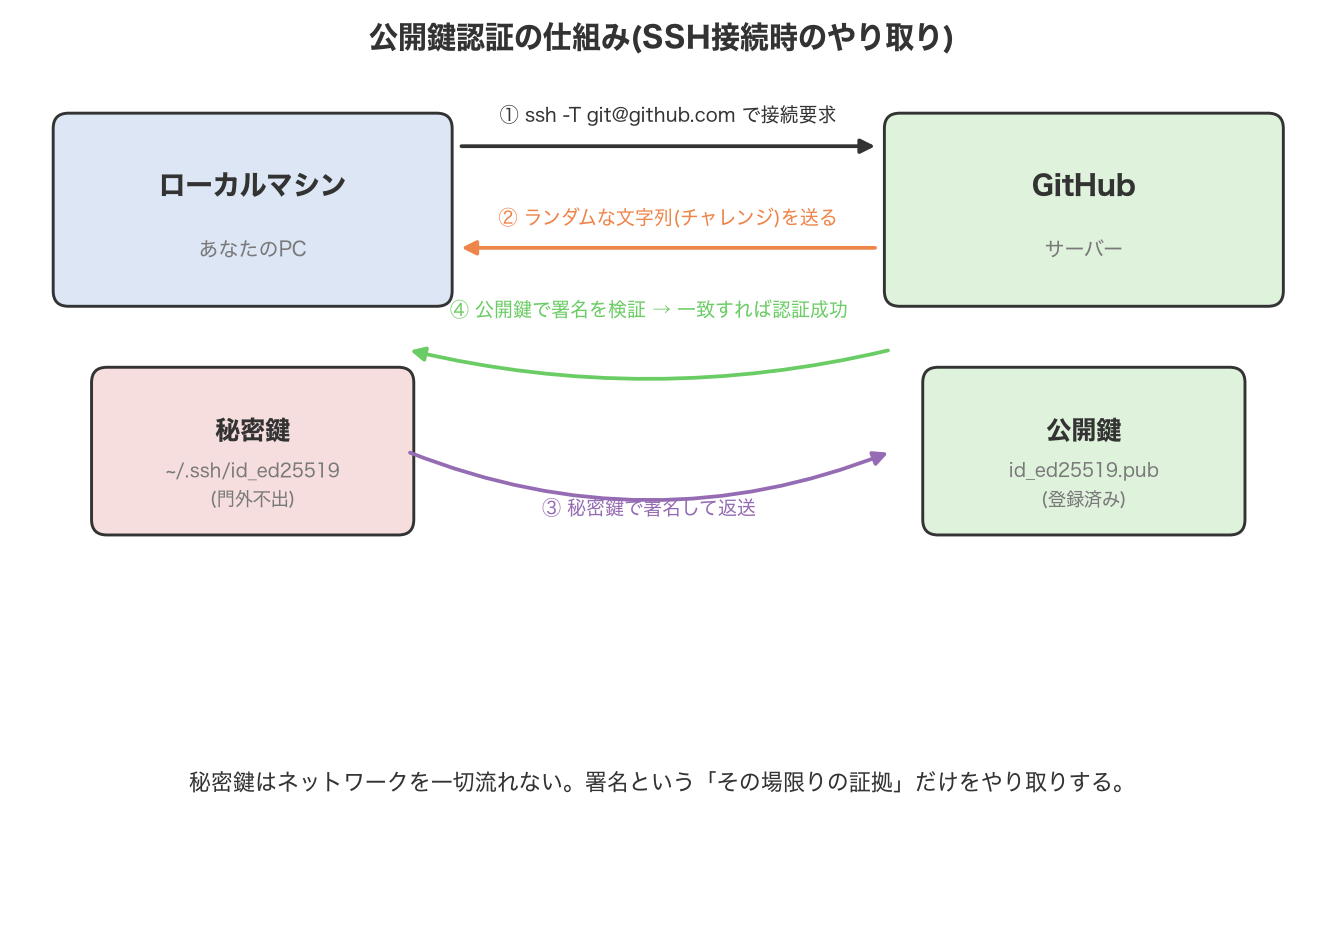
For a more general look at SSH public-key authentication setup — including server-side sshd_config and authorized_keys handling — see https://yuhi-sa.github.io/en/posts/20211121_linux/5/.
3. Creating an SSH Key with Ed25519
3.1 Check for Existing Keys
First, check whether you already have a key. It’s best to avoid reusing keys across services or machines, but it’s worth knowing your current setup before proceeding.
ls -la ~/.ssh
If you find a pair like id_ed25519 / id_ed25519.pub, or id_rsa / id_rsa.pub, you already have a key. If you’re creating a new one for GitHub, be careful not to overwrite an existing filename (more on managing multiple keys below).
3.2 Generate a Key Pair with ssh-keygen
GitHub’s current official documentation recommends Ed25519 as the algorithm. Despite its shorter key length compared to RSA, it offers strong security along with faster signing and verification, so it’s the sensible default for any new key.
ssh-keygen -t ed25519 -C "your_email@example.com"
The -C flag lets you attach an arbitrary comment. Using your GitHub-registered email address here makes it easy to tell which key belongs to which account just by looking at the contents of ~/.ssh/id_ed25519.pub later.
If your hardware security key (e.g., a YubiKey) doesn’t support Ed25519, you can use ecdsa-sk or ed25519-sk (the security-key variants) as an alternative.
Running the command will prompt you for two things.
Storage location: unless you have a specific reason not to, just press Enter to accept the default.
Enter a file in which to save the key (/Users/you/.ssh/id_ed25519): [Enter]
Passphrase: an additional password that encrypts the private key file itself. Setting one is strongly recommended.
Enter passphrase (empty for no passphrase): [type a passphrase]
Enter same passphrase again: [retype it]
Even with a passphrase set, ssh-agent (and, on macOS, Keychain integration, covered below) means you won’t be prompted every time you connect. Leaving it blank is possible, but understand the tradeoff: if the private key file is ever stolen, it can be used as-is with no additional barrier.
Once generation finishes, two files appear in the directory you chose: the private key (id_ed25519) and the public key (id_ed25519.pub). Only the public key (the one ending in .pub) gets registered with GitHub. Never share the private key or commit it to a repository.
3.3 Copy the Public Key Contents
Copy the contents of the generated public key to your clipboard. The method differs by OS.
- macOS
pbcopy < ~/.ssh/id_ed25519.pub - Linux (with xclip installed)If xclip isn’t installed, display the contents with
xclip -sel clip < ~/.ssh/id_ed25519.pubcat ~/.ssh/id_ed25519.puband copy manually. - Windows (Git Bash / PowerShell)
clip < ~/.ssh/id_ed25519.pub
4. Registering the Public Key with GitHub
You can register a public key either through the web UI or via the GitHub CLI (gh).
4.1 Registering via the Web UI
- Log in to GitHub, click your profile icon in the top right, and select “Settings”.
- Select “SSH and GPG keys” from the left sidebar.
- Click “New SSH key” (or “Add SSH key”).
- In “Title”, enter a name that helps you identify the key later (e.g.,
MacBook Pro 2026). - Leave “Key type” as “Authentication Key” for normal use (choose “Signing Key” if registering a separate key for commit signing).
- Paste the public key contents you copied earlier into the “Key” field.
- Click “Add SSH key” to finish.
4.2 Registering via the gh CLI
If you have the GitHub CLI installed and are already logged in via gh auth login, you can register a key in a single command.
gh ssh-key add ~/.ssh/id_ed25519.pub --title "MacBook Pro 2026"
To register the key for commit signing instead, add --type signing.
gh ssh-key add ~/.ssh/id_ed25519.pub --type signing --title "MacBook Pro 2026 (signing)"
5. Configuring ssh-agent and ~/.ssh/config
Creating and registering the key alone still leaves you re-entering the passphrase on every connection (if you set one). Registering the key with ssh-agent eliminates that friction.
5.1 Start ssh-agent
macOS / Linux (same command)
eval "$(ssh-agent -s)"
5.2 Configure ~/.ssh/config
Add a GitHub host entry to ~/.ssh/config (create the file if it doesn’t exist).
macOS (Sierra 10.12.2 or later, with Keychain integration)
Host github.com
  AddKeysToAgent yes
  UseKeychain yes
  IdentityFile ~/.ssh/id_ed25519
With UseKeychain yes, the passphrase you enter once is saved to macOS Keychain, and it’s automatically loaded into ssh-agent again after a reboot. If you didn’t set a passphrase, omit the UseKeychain line entirely.
To register the key with both ssh-agent and Keychain, run this once:
ssh-add --apple-use-keychain ~/.ssh/id_ed25519
(On macOS versions before Monterey, use the -K flag instead of --apple-use-keychain.)
Linux
Host github.com
  AddKeysToAgent yes
  IdentityFile ~/.ssh/id_ed25519
For Keychain-equivalent persistence, use GNOME Keyring or your distribution’s standard SSH tooling. After configuring, register the key with ssh-add ~/.ssh/id_ed25519.
Windows
Open PowerShell as Administrator and enable, then start, the OpenSSH Authentication Agent service.
Get-Service -Name ssh-agent | Set-Service -StartupType Manual
Start-Service ssh-agent
If you’re using Git for Windows, the MSYS2 version of ssh bundled with Git Bash sometimes fails to communicate with the Windows ssh-agent, causing connection failures. If that happens, configuring Git to always use the standard Windows SSH client usually resolves it.
git config --global core.sshCommand "C:/Windows/System32/OpenSSH/ssh.exe"
5.3 Add the Key to ssh-agent (non-macOS)
ssh-add ~/.ssh/id_ed25519
You can check the list of registered keys with:
ssh-add -l -E sha256
6. Testing the Connection and Switching Remote URLs
6.1 Testing the Connection
Once configured, verify that you can actually connect to GitHub over SSH.
ssh -T git@github.com
On first connection, GitHub’s host key fingerprint is displayed and you’re asked to confirm you trust it.
The authenticity of host 'github.com (IP ADDRESS)' can't be established.
ED25519 key fingerprint is SHA256:+DiY3wvvV6TuJJhbpZisF/zLDA0zPMSvHdkr4UvCOqU.
Are you sure you want to continue connecting (yes/no/[fingerprint])?
Confirm that the displayed fingerprint matches the value GitHub publishes officially before typing yes (GitHub’s ED25519 host key fingerprint is SHA256:+DiY3wvvV6TuJJhbpZisF/zLDA0zPMSvHdkr4UvCOqU; you can check the current value on the official “GitHub’s SSH key fingerprints” page).
A successful connection shows:
Hi username! You've successfully authenticated, but GitHub does not provide shell access.
username is replaced with your GitHub username. Note that since GitHub doesn’t provide shell access, this command exiting with status code 1 is expected behavior, not an error.
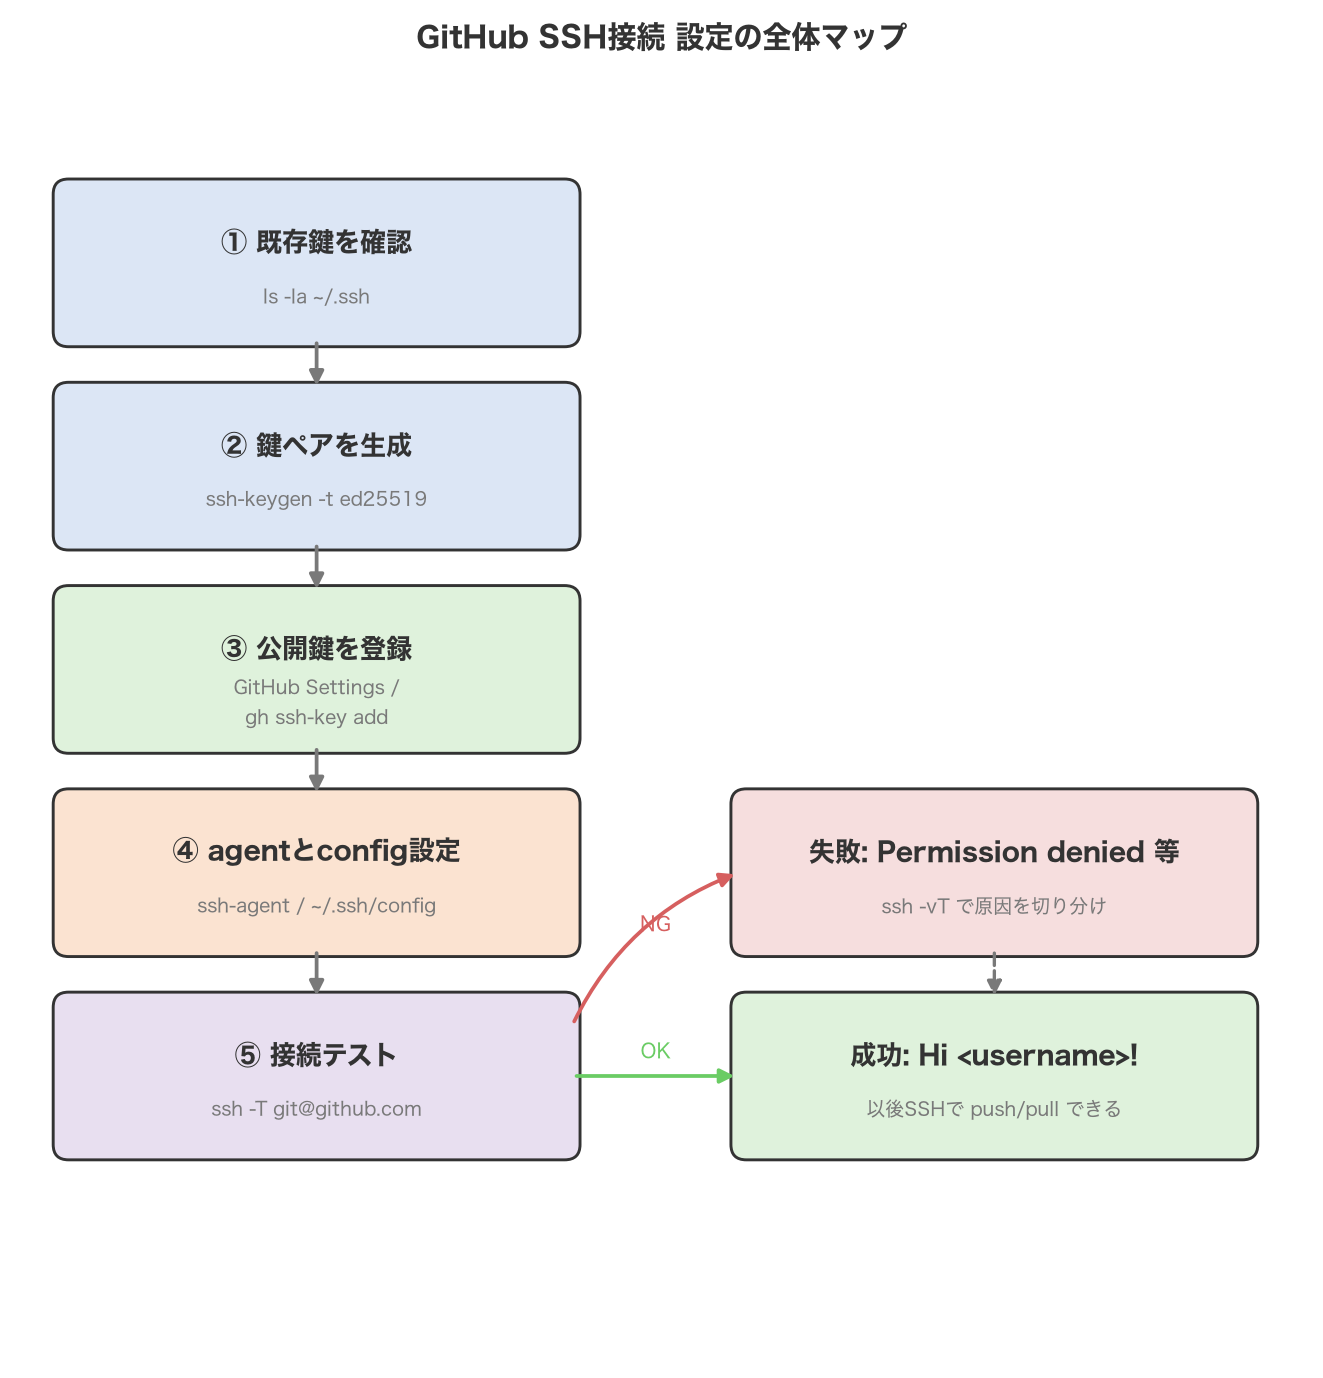
6.2 Switching an Existing Repository’s Remote URL from HTTPS to SSH
If you already have a repository cloned over HTTPS, changing the remote URL to SSH format routes all future push/pull operations over SSH.
cd path/to/your/repo
git remote set-url origin git@github.com:your-username/your-repo.git
You can check the current remote URL with git remote -v.
git remote -v
7. Troubleshooting
Below are the most common SSH connection errors and how to resolve them. The verbose flag (-v, combined as -vT) is extremely useful for narrowing down the cause.
ssh -vT git@github.com
7.1 Permission denied (publickey)
This is the most common error. It means the server has rejected the connection, and several causes are possible.
- The key isn’t loaded into ssh-agent: Check with
ssh-add -l -E sha256to see if your key is listed. If not, add it withssh-add ~/.ssh/id_ed25519. - The public key isn’t registered to your GitHub account: Check the “SSH and GPG keys” settings page to confirm a key with the matching fingerprint is registered. You can check your local public key’s fingerprint with
ssh-keygen -lf ~/.ssh/id_ed25519.pub. - You ran the command with
sudo: Runningsudo git ...references a different configuration (root’s~/.ssh) than the key you generated as a regular user, causing authentication to fail. Avoidsudofor Git operations unless there’s a specific reason for it. - You’re connecting with your GitHub username instead of
git: SSH connections to GitHub always use thegituser. Replacing thegitpart ofgit@github.comwith your own username will fail.
When reading the output of ssh -vT git@github.com, focus on:
- If you see both
Offering public keyandServer accepts key, that key was correctly presented and accepted. - If
Trying private keyis followed by a message that the key can’t be found, either the key doesn’t exist at the specified path, or theIdentityFilesetting in~/.ssh/configis wrong. - If
Authentications that can continue: publickeyappears right before the connection drops, the key you presented is most likely not registered with GitHub.
7.2 Host key verification failed
As a security measure, SSH records the host key of every server you’ve connected to in ~/.ssh/known_hosts, and checks it hasn’t changed on subsequent connections. This error appears when GitHub returns a host key that differs from what’s expected, which can happen after infrastructure changes on GitHub’s side. First, confirm the displayed fingerprint matches GitHub’s officially published host key fingerprint; only if it matches should you remove the corresponding line from ~/.ssh/known_hosts and reconnect. If this warning appears unexpectedly with no known cause, don’t simply answer yes — a mismatched fingerprint can indicate a man-in-the-middle attack, so investigate your network environment first.
7.3 Other Common Errors
- Bad file number: Usually caused by a firewall or proxy blocking SSH traffic (port 22). Try connecting over port 443 instead, as described below.
- Key already in use: Occurs when the same public key is already registered to a different GitHub account or as a deploy key on another repository. As a rule, use one key per account.
- Workaround for environments that block port 22: Add the following to
~/.ssh/configto connect over port 443 instead.Host github.com Hostname ssh.github.com Port 443 User git
Advanced: Managing Multiple Accounts
If you need to use multiple GitHub accounts on a single machine — say, one for work and one personal — separate the keys per account and set up Host aliases in ~/.ssh/config.
ssh-keygen -t ed25519 -C "work@example.com" -f ~/.ssh/id_ed25519_work
ssh-keygen -t ed25519 -C "personal@example.com" -f ~/.ssh/id_ed25519_personal
After registering each public key with its corresponding GitHub account, set up Host aliases in ~/.ssh/config like this:
Host github.com-work
  HostName github.com
  User git
  IdentityFile ~/.ssh/id_ed25519_work
  IdentitiesOnly yes

Host github.com-personal
  HostName github.com
  User git
  IdentityFile ~/.ssh/id_ed25519_personal
  IdentitiesOnly yes
When cloning or setting a remote URL, use the alias in place of the real hostname.
git clone git@github.com-work:work-org/repo.git
# For an existing repository
git remote set-url origin git@github.com-personal:your-username/repo.git
Setting IdentitiesOnly yes ensures that only the specified IdentityFile is used, even if other keys are loaded into ssh-agent — preventing accidental connections with the wrong key.
Summary
Setting up SSH for GitHub comes down to this sequence:
- Generate an Ed25519 key pair with
ssh-keygen -t ed25519 - Register only the public key (
.pub) with GitHub (via the web UI orgh ssh-key add) - Configure ssh-agent and
~/.ssh/configso you’re never re-prompted for the passphrase - Verify the connection with
ssh -T git@github.com - Switch any existing repository’s remote URL to SSH format
If you get stuck, read the verbose output of ssh -vT git@github.com and check two things in order: whether the key is being offered, and whether it’s registered with GitHub. That resolves the vast majority of errors.
Frequently Asked Questions
Q. Should I use Ed25519 or RSA? A. For a new key, Ed25519 is the default choice. It offers strong security with a shorter key length, and generation/signing are both faster. If you’re already using an existing RSA key, GitHub still supports it, so there’s no urgent need to switch — but keep in mind that any RSA key generated after November 2, 2021 is required to use a SHA-2 signature algorithm (modern OpenSSH clients handle this automatically, so it’s usually not something you need to think about).
Q. Should I set a passphrase? A. Yes, it’s recommended. A private key without a passphrase can be used for authentication immediately if the file itself is stolen. With ssh-agent configured (and Keychain integration on macOS), you won’t be prompted for the passphrase on every connection even when one is set, so you get better security without sacrificing convenience.
Q. Do I register the public key or the private key with GitHub?
A. The public key (the file ending in .pub, like id_ed25519.pub). Never share the private key (the file without .pub) — keep it on your local machine only.
Q. How do I stop being prompted for the passphrase every time?
A. Add the key to ssh-agent (ssh-add ~/.ssh/id_ed25519) and set AddKeysToAgent yes in ~/.ssh/config. On macOS, also add UseKeychain yes and run ssh-add --apple-use-keychain ~/.ssh/id_ed25519 once — after that, you can connect without a passphrase prompt even across reboots.
References
- GitHub Docs: Connecting to GitHub with SSH
- GitHub Docs: About SSH
- GitHub Docs: Generating a new SSH key and adding it to the ssh-agent
- GitHub Docs: Adding a new SSH key to your GitHub account
- GitHub Docs: Testing your SSH connection
- GitHub Docs: GitHub’s SSH key fingerprints
- GitHub Docs: Troubleshooting SSH
- GitHub Docs: Error: Permission denied (publickey)
- GitHub Docs: Using SSH over the HTTPS port