July 2026 full rewrite: This article originally covered “boto3 setup and S3/AI service usage examples” as of 2022. The recommended authentication flow and the positioning of the client/resource APIs have both changed since then. This is a complete rewrite based on primary sources as of July 2026, including the official boto3 documentation .
boto3 is the official AWS SDK for operating AWS services from Python. Putting a file in S3, writing a record to DynamoDB, invoking a Lambda function — boto3 lets you run these operations directly from Python code, and it shares the same underlying foundation (botocore) with the AWS CLI.
This article walks through installing boto3 and setting up authentication, the difference between the low-level client API and the high-level resource API (and where things currently stand), the basics of S3 operations, handling large datasets with paginators, error handling and retry configuration, and finally how to call major AWS services other than S3 — all based on the official documentation as of July 2026.
1. What Is boto3?
boto3 is the official Python SDK developed and maintained by Amazon Web Services (AWS). The name “boto” refers to the Amazon river dolphin, and the “3” indicates the Python 3 generation. Internally, it’s built on top of botocore, a lower-level library that handles the actual HTTP requests and responses for each AWS service API. The AWS CLI (the aws command) shares this same botocore foundation, and boto3 and the AWS CLI read the same configuration files for credentials.
With boto3, you can do things like the following directly from Python code:
- Upload/download files to/from S3, list buckets, generate presigned URLs
- Read and write items to DynamoDB, run queries
- Invoke Lambda functions (synchronously or asynchronously)
- Start/stop EC2 instances, send/receive SQS queue messages, and call managed ML services like Translate and Comprehend
boto3 covers virtually every service AWS offers, and support for new services is typically released around the same time as the service itself. As of this writing (July 2026), the latest version is 1.43.51 (released July 17, 2026), and the minimum supported Python version is Python 3.10 or later.
2. Installation and Authentication Setup
Installation
boto3 is distributed as a regular package on PyPI, so it can be installed with pip or uv.
# With pip
pip install boto3

# With uv, adding it to a project
uv add boto3
If you want to systematically set up your Python environment itself (version management, virtual environments, and reproducible dependencies), see The Definitive Guide to Python Environment Setup , which covers 2026-era best practices centered on uv.
How credentials are configured, and the search order
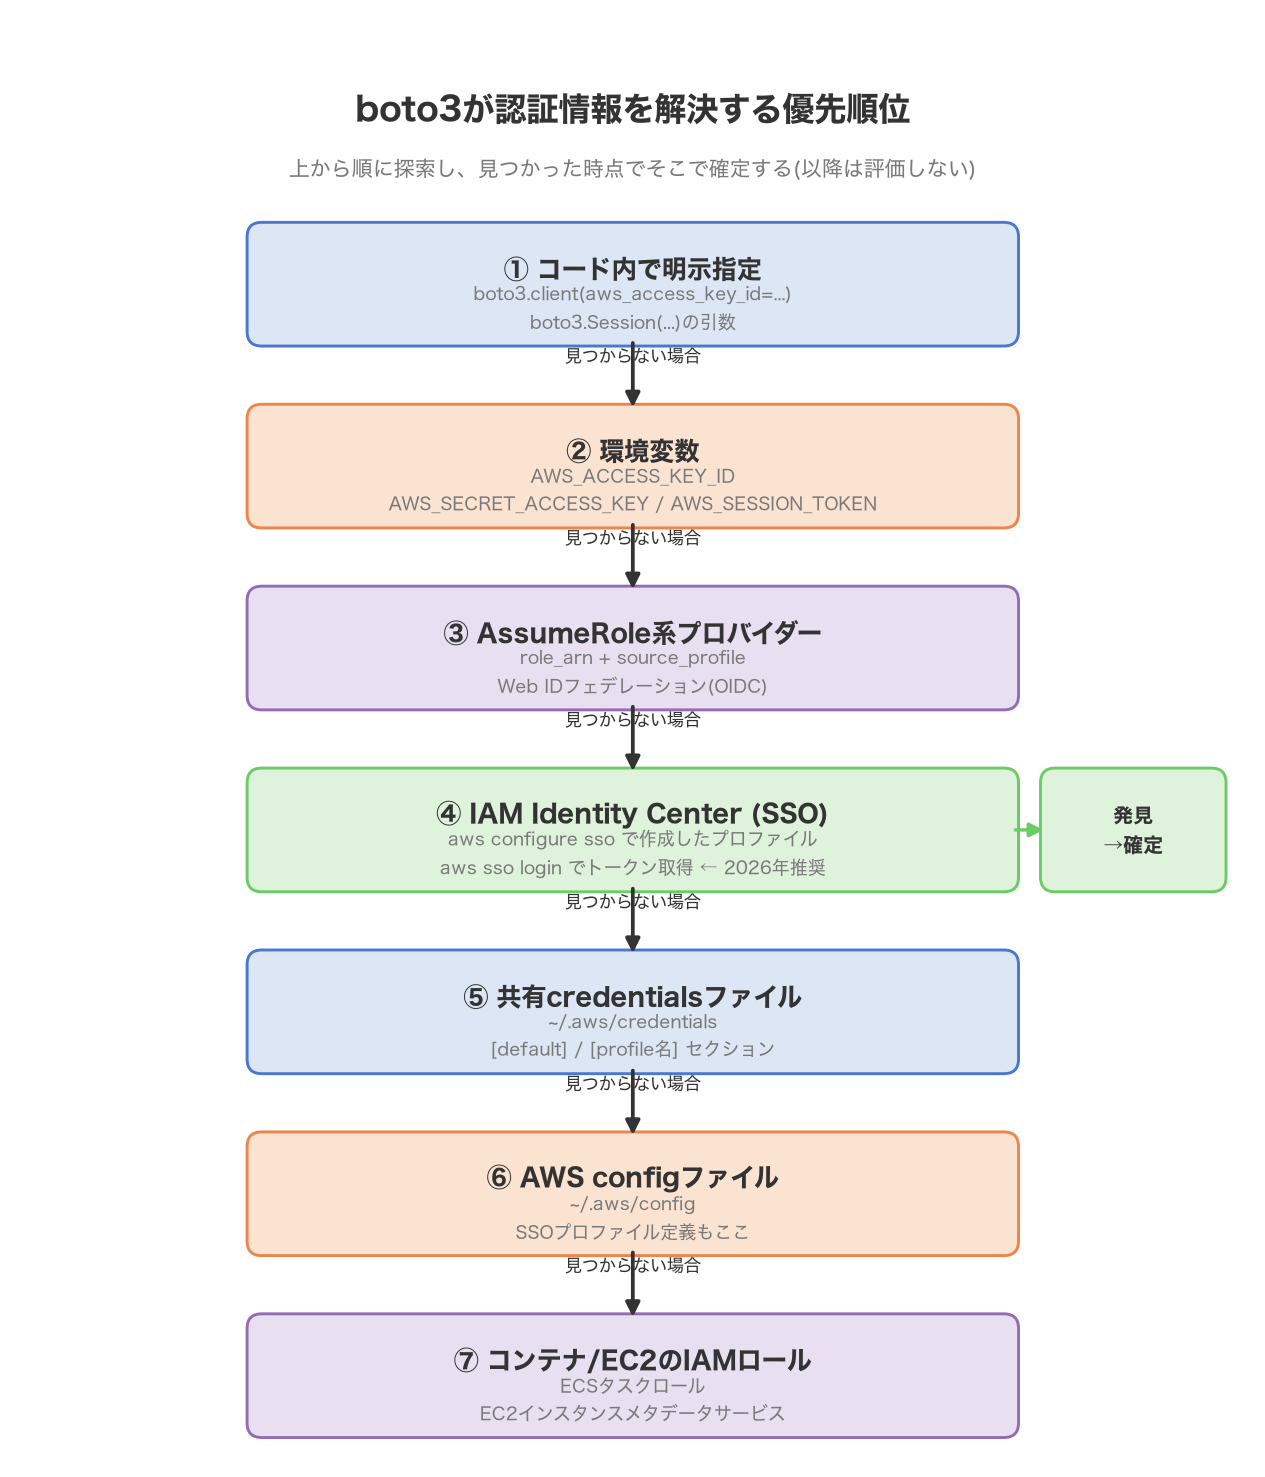
Whenever boto3 calls an AWS service, it needs credentials to prove its identity to AWS. boto3 itself doesn’t store credentials anywhere; at runtime it searches several locations in a fixed order and uses the first set of credentials it finds. That search order is as follows (evaluated top to bottom, stopping as soon as credentials are found):
- Credentials passed directly as arguments to
boto3.client()/boto3.Session() - Environment variables (
AWS_ACCESS_KEY_ID/AWS_SECRET_ACCESS_KEY/AWS_SESSION_TOKEN) - The assume-role provider (
role_arn+source_profilein~/.aws/config) - The web identity federation provider (OIDC federation)
- The IAM Identity Center (formerly AWS SSO) credential provider
- The shared credentials file (
~/.aws/credentials) - Console login credentials
- The AWS config file (
~/.aws/config) - Boto2-compatible configuration files (
/etc/boto.cfg,~/.boto) - Container credential providers (e.g., ECS task roles)
- The EC2 instance metadata service (an IAM role attached to the instance)
Visually, this looks like the flow below.
Figure 1: The order in which boto3 resolves credentials
Using IAM Identity Center (SSO) — the 2026 recommendation
The 2022 version of this article covered issuing a long-lived access key ID and secret access key and placing them directly in ~/.aws/credentials. But this approach always carries the risk that if the key leaks, it can be abused indefinitely. As of 2026, the official documentation recommends using IAM Identity Center (a mechanism for assigning organizational users to a set of AWS accounts via single sign-on, formerly known as AWS SSO) for interactive individual use, obtaining short-lived credentials each time.
# One-time setup: create an SSO profile interactively (written to ~/.aws/config)
aws configure sso

# Re-authenticate when the session expires (the SDK auto-refreshes the token while it's valid)
aws sso login --profile my-sso-profile
Once created, the profile can be used from boto3 simply by referencing it:
import boto3

session = boto3.Session(profile_name="my-sso-profile")
s3 = session.client("s3")
On the other hand, for execution environments where interactive login isn’t possible — CI/CD pipelines, or applications running on EC2/ECS — the standard approach is to use an IAM role (an EC2 instance profile or an ECS task role). These are picked up automatically at the end of the search order (items 10 and 11 above), so no explicit configuration is needed in the code.
If you have no choice but to use an access key, never hardcode it in your code. Keep it in an environment variable or in ~/.aws/credentials, and make sure it’s excluded from your repository.
# Setting credentials via environment variables (e.g., for temporary testing)
export AWS_ACCESS_KEY_ID="AKIA..."
export AWS_SECRET_ACCESS_KEY="..."
export AWS_DEFAULT_REGION="ap-northeast-1"
3. Client vs. Resource: The Difference and Where Things Stand Today
boto3 offers two interfaces for calling AWS services.
- client (low-level API): A thin wrapper that maps one-to-one to each service’s API operations. Method names are the snake_case form of the API name, and responses come back as plain Python dictionaries.
- resource (high-level API): A more Pythonic abstraction layer that lets you treat things like buckets or tables as objects. It offers conveniences like lazy-loaded attributes and collection-style iteration.
import boto3

# client: low-level API
s3_client = boto3.client("s3")
s3_client.list_buckets()

# resource: high-level API
s3_resource = boto3.resource("s3")
for bucket in s3_resource.buckets.all():
    print(bucket.name)
As of 2022, the common advice was “use resource if you want simplicity, use client if you need fine-grained control.” That guidance no longer holds. The boto3 development team has explicitly stated that it does not intend to add new features to the resource interface, and the official explanation posted on GitHub reads as follows:
The AWS Python SDK team does not intend to add new features to the resources interface in boto3. Existing interfaces will continue to operate during boto3’s lifecycle. Customers can find access to newer service features through the client interface.
This is not a “deprecation” — existing resource-based code will keep working. However, new AWS services and new features of existing services are essentially only added to the client interface, effectively leaving resource in a feature freeze, and the documentation for some services (such as DynamoDB) explicitly directs users to the client interface. As a result, for code you’re writing new in 2026, client should be your default choice. If you already have working resource-based code in an existing project, there’s no need to rewrite it just for the sake of it — but any new code you add should be written against client.
All the sample code in the rest of this article uses the client API consistently.
4. S3 Basics
S3 (Simple Storage Service) is one of the most commonly used services with boto3. This section covers the basics: listing buckets, uploading/downloading files, and generating presigned URLs.
Initializing a client and listing buckets
import boto3

s3 = boto3.client("s3", region_name="ap-northeast-1")

response = s3.list_buckets()
for bucket in response["Buckets"]:
    print(bucket["Name"])
Uploading and downloading files
Use upload_file to upload a local file and download_file to download one. For files large enough to require multipart transfer, boto3 automatically splits them and transfers the parts in parallel behind the scenes.
import boto3
from botocore.exceptions import ClientError

s3 = boto3.client("s3", region_name="ap-northeast-1")

# Upload
try:
    s3.upload_file("local_file.csv", "my-bucket", "data/local_file.csv")
except ClientError as e:
    print(f"Upload failed: {e}")

# Download
try:
    s3.download_file("my-bucket", "data/local_file.csv", "downloaded.csv")
except ClientError as e:
    print(f"Download failed: {e}")
If you want to work directly with a file-like object (e.g., data already loaded into memory) rather than a file path, use upload_fileobj / download_fileobj. Note that the file must be opened in binary mode ("rb" / "wb").
with open("local_file.csv", "rb") as f:
    s3.upload_fileobj(f, "my-bucket", "data/local_file.csv")
Additional options like metadata and ACLs are passed together via ExtraArgs.
s3.upload_file(
    "local_file.csv",
    "my-bucket",
    "data/local_file.csv",
    ExtraArgs={"Metadata": {"source": "batch-job"}},
)
Generating presigned URLs
A presigned URL grants time-limited access to a specific S3 object to a third party who doesn’t hold IAM credentials. It’s commonly used to let a frontend upload directly to S3, or to share a file temporarily.
import boto3
from botocore.exceptions import ClientError

s3 = boto3.client("s3", region_name="ap-northeast-1")

try:
    url = s3.generate_presigned_url(
        "get_object",
        Params={"Bucket": "my-bucket", "Key": "data/local_file.csv"},
        ExpiresIn=3600,  # Expiration in seconds; 3600 is also the default
    )
    print(url)
except ClientError as e:
    print(f"Failed to generate presigned URL: {e}")
The first argument to generate_presigned_url is the name of the target API operation (get_object for retrieval, or put_object if you want to issue a URL for uploading). This call only generates a URL string — no actual request is sent to AWS — so it carries no network cost of its own.
5. Handling Large Datasets — Paginators and Waiters
Pagination with paginators
Many AWS APIs, such as S3’s list_objects_v2 or DynamoDB’s query, cap the number of results returned in a single request, and getting the rest requires repeated requests using a “next page” token. The paginator automates this boilerplate.
import boto3

s3 = boto3.client("s3", region_name="ap-northeast-1")
paginator = s3.get_paginator("list_objects_v2")

page_iterator = paginator.paginate(Bucket="my-bucket", Prefix="logs/")

for page in page_iterator:
    for obj in page.get("Contents", []):
        print(obj["Key"], obj["Size"])
The set of operation names you can pass to get_paginator() is limited to those the client supports pagination for — not every API operation has a paginator available. PaginationConfig lets you control the total item limit and the page size.
page_iterator = paginator.paginate(
    Bucket="my-bucket",
    PaginationConfig={"MaxItems": 1000, "PageSize": 100},
)
You can also chain client-side filtering with JMESPath via search().
filtered = page_iterator.search("Contents[?Size > `1000000`][]")
for obj in filtered:
    print(obj["Key"])
Waiters — waiting for a state change
A waiter polls until a resource reaches a specific state. For example, you might want to wait until an object is actually readable right after creating a bucket.
s3 = boto3.client("s3", region_name="ap-northeast-1")

# Wait until the bucket exists
waiter = s3.get_waiter("bucket_exists")
waiter.wait(Bucket="my-bucket")

# Wait until a specific object exists
obj_waiter = s3.get_waiter("object_exists")
obj_waiter.wait(Bucket="my-bucket", Key="data/local_file.csv")
You can check the list of available waiters via client.waiter_names. Some services don’t define any waiters at all.
6. Error Handling and Retries
The structure of ClientError
Whenever AWS returns an error response through boto3, a common botocore.exceptions.ClientError exception is raised. The error details live in response["Error"]["Code"] and response["Error"]["Message"].
import boto3
from botocore.exceptions import ClientError, NoCredentialsError

s3 = boto3.client("s3", region_name="ap-northeast-1")

try:
    s3.head_object(Bucket="my-bucket", Key="not-exist.csv")
except ClientError as e:
    code = e.response["Error"]["Code"]
    if code == "404":
        print("Object does not exist")
    else:
        raise
except NoCredentialsError:
    print("No credentials found. Check aws configure sso / aws sso login")
Each client object also exposes service-specific exception classes via client.exceptions. This is useful when you’d rather branch on exception type than compare error code strings.
try:
    dynamodb.describe_table(TableName="not-exist-table")
except dynamodb.exceptions.ResourceNotFoundException:
    print("Table does not exist")
Retry configuration (botocore.config.Config)
botocore automatically retries transient errors such as throttling (rate limiting). To change the default behavior, pass a botocore.config.Config when creating the client.
import boto3
from botocore.config import Config

config = Config(
    retries={
        "total_max_attempts": 10,  # Total attempts, including the initial request
        "mode": "standard",        # legacy (default) / standard / adaptive
    }
)

s3 = boto3.client("s3", region_name="ap-northeast-1", config=config)
There are three retry modes. The default, legacy, retries only a minimal set of errors, whereas standard covers throttling-related errors more broadly with exponential backoff and circuit-breaker-like behavior. adaptive goes further still, dynamically adjusting the client-side request rate itself (an experimental feature). Unless you have a specific reason not to, explicitly specifying standard gives you more predictable behavior.
You can also configure the same settings per profile in ~/.aws/config.
[profile my-sso-profile]
region = ap-northeast-1
retry_mode = standard
max_attempts = 10
7. Examples with Major Services Other Than S3
The way you use boto3 is fundamentally the same regardless of the service: create a boto3.client("service-name") and call the corresponding methods. Here are minimal examples for DynamoDB and Lambda.
DynamoDB
With the client API, you need to explicitly specify the type of each value, like {"S": "string"} or {"N": "123"} (the resource API used to do this conversion implicitly, but as noted above, client is now the recommended choice for new development).
import boto3

dynamodb = boto3.client("dynamodb", region_name="ap-northeast-1")

# Write
dynamodb.put_item(
    TableName="my-table",
    Item={
        "pk": {"S": "user#1"},
        "name": {"S": "Taro"},
        "age": {"N": "30"},
    },
)

# Read
response = dynamodb.get_item(
    TableName="my-table",
    Key={"pk": {"S": "user#1"}},
)
print(response.get("Item"))
Lambda
An example of synchronously invoking a Lambda function and exchanging a JSON payload.
import json
import boto3

lambda_client = boto3.client("lambda", region_name="ap-northeast-1")

response = lambda_client.invoke(
    FunctionName="my-function",
    InvocationType="RequestResponse",  # Synchronous (default); use "Event" for async
    Payload=json.dumps({"key": "value"}),
)

result = json.loads(response["Payload"].read())
print(result)
Setting InvocationType to "Event" makes the call asynchronous — control returns as soon as the request is queued on the Lambda side. Synchronous invocation payloads are capped at 6 MB, and asynchronous ones at 1 MB.
Summary
boto3 is AWS’s official Python SDK, installable with pip install boto3 or uv add boto3. Credentials are resolved from several locations — environment variables, the shared credentials file, IAM Identity Center (SSO), IAM roles, and more — in a fixed order, and as of 2026, IAM Identity Center is the standard for interactive use, while IAM roles are the standard on CI/CD or EC2/ECS. There are two API interfaces, client and resource, but resource is in a feature freeze and receives no new functionality, so new code should default to client — a practical conclusion as of 2026.
Once you have the basic patterns down — S3 operations (upload/download/presigned URLs), paginators for large datasets, waiters for state changes, and error handling and retry configuration via ClientError — you can apply nearly the same approach to other services like DynamoDB and Lambda.
Frequently Asked Questions (FAQ)
What’s the difference between boto3 and the AWS CLI?
boto3 is an SDK library for operating AWS services from Python code, while the AWS CLI (the aws command) is a command-line tool for operating AWS services from a shell. Both share the same underlying low-level library (botocore) internally, and they read the same credential configuration files (~/.aws/credentials, ~/.aws/config). The AWS CLI is a good fit for operations that fit in a shell script or a one-liner, while boto3 is better suited to application logic involving conditionals and loops (see Chapter 2).
Why shouldn’t I hardcode access keys?
Access key IDs and secret access keys always carry the risk of being unintentionally exposed on GitHub or left in logs if they’re included in code or a repository. If a long-lived key leaks, it can be abused indefinitely. Since boto3 can automatically load credentials from several sources — environment variables, ~/.aws/credentials, IAM Identity Center, and more — the code only needs to specify which route to authenticate through; the actual values should be managed outside the code (see Chapter 2).
Should I use resource or client?
As of 2026, you should generally use client for new code. The boto3 development team has explicitly stated it does not intend to add new features to the resource interface, and new API features and services are only implemented on the client side. Existing resource-based code won’t stop working immediately, but any code you continue to maintain and extend going forward is safer written against client (see Chapter 3).
How do I handle an authentication error (NoCredentialsError)?
botocore.exceptions.NoCredentialsError occurs when boto3 fails to find valid credentials anywhere in its search order. Start by checking whether your IAM Identity Center session is still valid with aws sso login --profile <profile-name>, then check for missing environment variables, gaps in ~/.aws/credentials, or an incorrect profile name (boto3.Session(profile_name=...)). If you’re running on EC2/ECS, verify that an IAM role is correctly attached to the instance profile or task role (see Chapters 2 and 6).
References
- AWS (2026). Boto3 Documentation. https://docs.aws.amazon.com/boto3/latest/guide/
- AWS (2026). Boto3: Credentials. https://docs.aws.amazon.com/boto3/latest/guide/credentials.html
- AWS (2026). Boto3: Clients. https://docs.aws.amazon.com/boto3/latest/guide/clients.html
- AWS (2026). Boto3: Resources. https://docs.aws.amazon.com/boto3/latest/guide/resources.html
- AWS (2026). Boto3: Uploading files. https://docs.aws.amazon.com/boto3/latest/guide/s3-uploading-files.html
- AWS (2026). Boto3: Presigned URLs. https://docs.aws.amazon.com/boto3/latest/guide/s3-presigned-urls.html
- AWS (2026). Boto3: Paginators. https://docs.aws.amazon.com/boto3/latest/guide/paginators.html
- AWS (2026). Boto3: Error handling. https://docs.aws.amazon.com/boto3/latest/guide/error-handling.html
- AWS (2026). Boto3: Retries. https://docs.aws.amazon.com/boto3/latest/guide/retries.html
- AWS (2026). Configuring IAM Identity Center authentication with the AWS CLI. https://docs.aws.amazon.com/cli/latest/userguide/cli-configure-sso.html
- boto/boto3 (2024). Explanation of the freeze of resources development (Discussion #4147). https://github.com/boto/boto3/discussions/4147
- PyPI. boto3. https://pypi.org/project/boto3/