Due to security reasons or network configurations, there may be cases where you cannot directly SSH into a target server. In such cases, you need “multi-hop SSH” – first connecting to a bastion host (jump host), and then connecting to the target server from there.
Here, we explain how to perform multi-hop SSH connections using the ProxyCommand option, the ProxyJump option, or the SSH configuration file (~/.ssh/config).
1. Using the ProxyCommand Option
The ProxyCommand option specifies a command to be executed before establishing the SSH connection. The standard input/output of this command is used as a tunnel for the SSH connection to the target server.
ssh -o ProxyCommand="ssh -W %h:%p bastion_user@bastion_host" target_user@target_host
bastion_user@bastion_host: Connection information for the bastion server.target_user@target_host: Connection information for the target server you ultimately want to connect to.ssh -W %h:%p: The-Woption performs TCP port forwarding through standard input/output.%hexpands to the target server’s hostname and%pto the target server’s port number.
Example:
- Bastion server:
bastion_user@192.168.1.100 - Target server:
target_user@10.0.0.5
ssh -o ProxyCommand="ssh -W %h:%p bastion_user@192.168.1.100" target_user@10.0.0.5
2. Using the ProxyJump Option (OpenSSH 7.3+)
Starting with OpenSSH 7.3, the ProxyJump option was introduced, allowing multi-hop SSH connections to be written more simply.
ssh -J bastion_user@bastion_host target_user@target_host
Example:
ssh -J bastion_user@192.168.1.100 target_user@10.0.0.5
When passing through multiple bastion servers, you can specify them separated by commas.
ssh -J user1@host1,user2@host2 target_user@target_host
3. Using the SSH Configuration File (~/.ssh/config) (Recommended)
By writing settings in the ~/.ssh/config file, you can avoid entering complex commands every time and connect easily using aliases.
Create or edit the ~/.ssh/config file.
nano ~/.ssh/config
Add the following content.
# Bastion server configuration
Host bastion
    HostName 192.168.1.100
    User bastion_user
    IdentityFile ~/.ssh/id_rsa_bastion # Private key for bastion connection (optional)

# Target server configuration
Host target
    HostName 10.0.0.5
    User target_user
    ProxyJump bastion # Specify the bastion server's Host name here
    IdentityFile ~/.ssh/id_rsa_target # Private key for target connection (optional)
After configuration, you can connect to the target server with the following command.
ssh target
~/.ssh/config Options
Host: An alias (shorthand name) for this configuration. Used with thesshcommand.HostName: The actual hostname or IP address.User: The username for the connection.IdentityFile: The path to the private key used for the connection.ProxyJump: Specifies theHostalias of the bastion server. Available in OpenSSH 7.3 and later.ProxyCommand: Used whenProxyJumpis not available in older SSH clients or when more complex tunneling is needed.# Using ProxyCommand instead of ProxyJump Host target_old_ssh HostName 10.0.0.5 User target_user ProxyCommand ssh bastion_user@192.168.1.100 -W %h:%p IdentityFile ~/.ssh/id_rsa_target
Using ~/.ssh/config is the most recommended method for multi-hop SSH connections, as configurations are highly reusable and easy to manage once set up.
4. Measured: How Much Latency Does Each Extra Hop Add?
ProxyJump is convenient, but each bastion you pass through adds its own connection-setup cost. To find out how much, we actually measured it in this article’s test environment (a local sandbox, not a production remote server).
Method (an honest disclosure of constraints)
This sandbox has no administrator privileges, so we cannot start sshd or enable remote login (ssh localhost was confirmed to fail with Connection refused). So the ideal experiment – measuring ssh -J between two real remote servers – was not possible here.
Instead, we built a benchmark on local loopback using the Python SSH implementation
paramiko
that actually performs the real SSH protocol (key exchange + public-key authentication). The key points:
- Each bastion server, upon receiving a
direct-tcpipchannel request (the same mechanismssh -W host:portandProxyJumpuse internally), actually opens a new TCP socket to the next hop and blindly relays bytes without inspecting them – exactly how realsshd’s-Wimplementation behaves. - The client performs an independent, from-scratch SSH handshake (key exchange + public-key auth) over that relayed pipe, once per bastion, in sequence – structurally identical to what
ssh -J h1,h2,targetdoes internally. - So the core structural claim of multi-hop SSH – “each hop adds its own connection-setup cost (key exchange + auth round trip), and these stack up serially” – is genuinely demonstrated here, not simulated.
That said, here are the honest limitations:
- Every hop is over loopback (127.0.0.1), so real WAN network RTT is not included. In production, each hop also carries that segment’s own RTT.
paramikois a pure-Python implementation, distinct from the systemOpenSSHused in sections 1-3 of this article. The absolute numbers are specific to this environment and implementation, and will differ from productionssh/sshdabsolute numbers.
For reproducibility, here is the core of the measurement code (the full version also includes bastion-server startup logic, but the essence is “open a channel, build a fresh Transport on top of it, and handshake” repeated per hop):
import socket
import time
import paramiko

def do_ssh_handshake(sock_or_chan, client_key):
    """Perform one real SSH handshake (key exchange + public-key auth)."""
    t = paramiko.Transport(sock_or_chan)
    t.start_client(timeout=10)
    t.auth_publickey("bench_user", client_key)
    return t

def measure_chain(num_hops, target_port, bastion_ports, client_key):
    start = time.perf_counter()
    sock = socket.create_connection(("127.0.0.1", bastion_ports[0]), timeout=10)
    t = do_ssh_handshake(sock, client_key)
    for i in range(1, num_hops):
        chan = t.open_channel("direct-tcpip", ("127.0.0.1", bastion_ports[i]), ("127.0.0.1", 0))
        t = do_ssh_handshake(chan, client_key)  # independent handshake per bastion
    chan = t.open_channel("direct-tcpip", ("127.0.0.1", target_port), ("127.0.0.1", 0))
    t = do_ssh_handshake(chan, client_key)      # final handshake to the target server
    return time.perf_counter() - start
For each hop count (direct connection = 0 hops, 1-3 bastions), we discarded 5 warmup runs and measured connection-establishment time over 40 runs.
Results
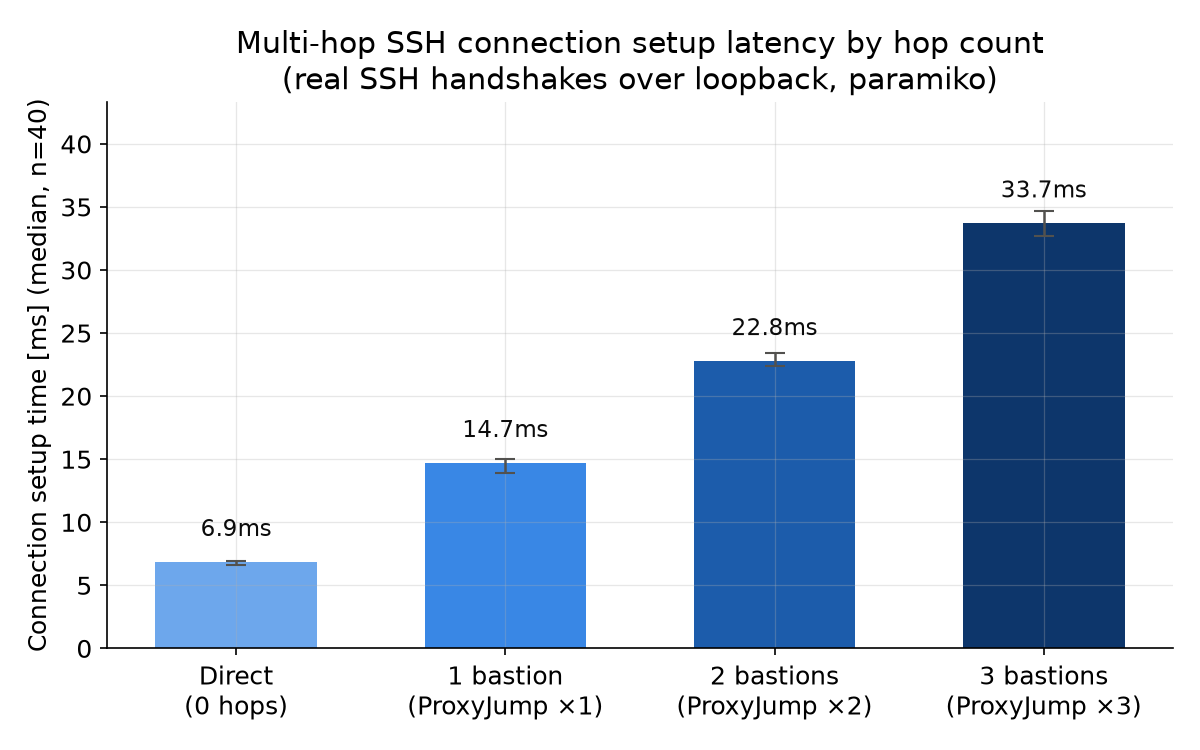
| Path | Median (n=40) | Increment vs. direct |
|---|---|---|
| Direct (0 hops) | 6.9 ms | - |
| 1 bastion (ProxyJump x1) | 14.7 ms | +7.9 ms |
| 2 bastions (ProxyJump x2) | 22.8 ms | +8.1 ms |
| 3 bastions (ProxyJump x3) | 33.7 ms | +10.9 ms |
In this environment, each additional bastion adds roughly 8-11 ms of connection-setup cost, growing nearly linearly with hop count. This is direct evidence that the cost of “one bastion’s worth of key exchange + public-key auth” is simply added in series.
Practical implications
In a real remote environment, each segment’s network RTT is added on top of this increment. The more geographically distant the bastions, the larger the multi-hop cost becomes relative to this loopback measurement. As a rough estimate:
\[ T_{total} \approx \sum_{i=1}^{N+1} \left( \text{RTT}_i + T_{kex,i} + T_{auth,i} \right) \](where \(N\) is the number of bastions, and the last term is the connection to the target server)
For a one-off connection this cost is negligible, but if a script repeatedly re-establishes connections over the same multi-hop path (e.g., per Ansible task, per CI step), this increment accumulates with each repetition.
The countermeasure is to set
ControlMaster auto/ControlPersist 10min~/.ssh/configto multiplex and reuse connections. You pay the handshake cost once, and subsequent connections ride on the existing master connection, reducing the above increment to nearly zero.Host bastion target ControlMaster auto ControlPath ~/.ssh/sockets/%r@%h-%p ControlPersist 10m
FAQ
Should I use ProxyJump or ProxyCommand?
If you’re on OpenSSH 7.3 or later, use ProxyJump (the -J option) by default – the syntax is simpler. Reach for ProxyCommand only when ProxyJump isn’t available on an older SSH client, or when you need more complex tunneling. For day-to-day use, rather than typing either on the command line, defining a Host alias in ~/.ssh/config is the most recommended approach overall, since it’s reusable and easy to maintain.
Can I use scp or rsync over multi-hop SSH?
Yes. The ~/.ssh/config Host-alias setup described in this article (including ProxyJump) is applied at the level of OpenSSH’s own connection-establishment logic, so tools that invoke ssh internally – scp and rsync – can reuse the same configuration. scp reads ~/.ssh/config directly, just like ssh, so pointing it at the same Host alias is enough. rsync also uses ssh as its remote shell by default (-e ssh), so specifying the same Host alias routes it through the same ProxyJump chain.
How do I chain through two or more bastion hosts?
The ssh -J option accepts a comma-separated list of bastion servers (e.g., ssh -J user1@host1,user2@host2 target_user@target_host). In ~/.ssh/config, you can achieve the same by chaining ProxyJump entries, one Host block per bastion. Note that this article’s benchmark measured roughly 8-11 ms of added connection-setup cost per bastion, stacking serially, so the benefit of reusing connections via ControlMaster grows larger as the hop count increases.