A Dockerfile is a text file for automatically building Docker images. The instructions written in a Dockerfile are executed sequentially from top to bottom, ultimately creating a Docker image. Here, we explain the major instructions commonly used in Dockerfiles, and then go further into how the order of those instructions affects build speed and image size — the layer-cache model, multi-stage builds, and running as a non-root user — the optimization points that matter once you’re writing Dockerfiles for real projects.
FROM
Specifies the base image. This must be the first instruction in the Dockerfile.
FROM <image_name>[:<tag>]
# Example: FROM ubuntu:22.04
# Example: FROM python:3.9-slim-buster
LABEL
Specifies image metadata. Written as key-value pairs, it can attach information about the image (author, version, description, etc.).
LABEL <key>="<value>" [<key>="<value>" ...]
# Example: LABEL maintainer="Your Name <your.email@example.com>"
# Example: LABEL version="1.0" description="My custom web app image"
USER
Specifies the user under which subsequent RUN, CMD, and ENTRYPOINT instructions are executed. The default is root. For security, it is recommended to specify a non-root user for operations that do not require privileges.
USER <username>[:<groupname>]
# Example: USER appuser
WORKDIR
Specifies the working directory for subsequent RUN, CMD, ENTRYPOINT, COPY, and ADD instructions. If specified as a relative path, it is relative to the previous WORKDIR instruction.
WORKDIR /path/to/workdir
# Example: WORKDIR /app
EXPOSE
Specifies the ports the container listens on. This serves as documentation; the docker run -p option is required to actually publish ports.
EXPOSE <port_number> [<port_number>/<protocol> ...]
# Example: EXPOSE 80
# Example: EXPOSE 8080/tcp 8080/udp
COPY
Copies files or directories from the host machine (the machine running the Docker daemon) into the container image.
COPY <host_path> <container_path>
# Example: COPY ./app /app
# Example: COPY requirements.txt /tmp/
ADD
Similar to COPY, but with the following additional features:
- If
host_pathis a URL, it downloads the file and places it in the container. - If
host_pathis a compressed file (tar, gzip, bzip2, etc.), it is automatically extracted in the container.
ADD <host_path_or_URL> <container_path>
# Example: ADD https://example.com/app.tar.gz /app/
Generally, COPY is preferred. Use ADD only when its additional features are needed.
RUN
Executes commands inside the container during image build time. This allows installing software and setting up files in the image.
RUN <command>
# Example: RUN apt-get update && apt-get install -y nginx
# Example: RUN pip install -r requirements.txt
Chaining multiple commands with && in a single RUN instruction reduces the number of image layers and makes efficient use of the build cache.
CMD
Specifies the default command to execute when the container starts. Only one can be specified per Dockerfile. If multiple are present, the last one takes effect.
CMD ["executable", "arg1", "arg2"] # exec form (recommended)
# Example: CMD ["nginx", "-g", "daemon off;"]
# Example: CMD ["python", "app.py"]

CMD command param1 param2 # shell form
# Example: CMD python app.py
In shell form, the command is executed with /bin/sh -c.
ENTRYPOINT
Specifies the command to execute when the container starts. Unlike CMD, ENTRYPOINT is always executed, and CMD is treated as arguments to ENTRYPOINT.
ENTRYPOINT ["executable", "arg1"] # exec form (recommended)
# Example: ENTRYPOINT ["/usr/sbin/nginx"]

ENTRYPOINT command param1 param2 # shell form
# Example: ENTRYPOINT nginx -g "daemon off;"
Combining ENTRYPOINT and CMD allows defining flexible container startup commands. For example, with ENTRYPOINT ["nginx"] and CMD ["-g", "daemon off;"], the container runs nginx -g "daemon off;" at startup. Specifying arguments with docker run overrides the CMD content.
So far we’ve covered the basic usage of each instruction. The rest of this article goes into the practical optimization points you need once you’re actually writing Dockerfiles for real projects.
A note on the environment this article was written in: The environment used to write this article does not have
dockerinstalled (docker --versionfails with a command-not-found error), so it was not possible to start a Docker daemon and actually build the images described below. Everything about build behavior in the sections that follow is therefore not a measured log, but a walkthrough based on the documented semantics in the Dockerfile reference and the official build cache documentation . Anywhere content is based on documented semantics rather than a measurement, it is called out explicitly.
The layer-cache model
Every instruction in a Dockerfile adds a new layer to the image each time it runs. A layer is a read-only filesystem diff; layers are applied on top of one another as instructions execute top to bottom, and the final image is the union of all layers.
What determines the cache key, and what invalidates it
Before executing each instruction, docker build checks, layer by layer, whether this instruction has been run before with the same input. If so, it skips execution and reuses the existing layer. This is the build cache. What counts as “the same input” depends on the kind of instruction:
- For instructions like
RUNthat take a command string as their argument, the cache is keyed on the instruction string itself (the command and its arguments) matching the previous build exactly. - For instructions like
COPYandADDthat pull files from the host into the image, the cache key also includes a checksum of the copied files’ content and metadata, in addition to the instruction string. If even a single byte of a referenced file changes, the cache for thatCOPY/ADDinstruction is invalidated.
The most important property here is that once one layer’s cache is invalidated, every layer after it in the Dockerfile is invalidated too — the invalidation cascades downstream. BuildKit treats layers as a dependency chain ordered by the Dockerfile’s instructions, so once the input to a layer partway through changes, the very premise for asking “is the input the same as last time?” breaks down for everything after it, and those layers are unconditionally re-run. Even if re-running would produce byte-for-byte identical output, Docker can’t know that without actually running the command, so it can’t be skipped.
Why “install dependencies first, copy application code later” is the standard optimization
This property is exactly why the standard practice is to COPY a dependency manifest (package.json, requirements.txt, go.mod, etc.) and install dependencies before copying the rest of the application code.
# Optimized order
FROM node:20-slim
WORKDIR /app
COPY package.json package-lock.json ./
RUN npm install
COPY . .
CMD ["node", "server.js"]
Application code changes far more often than the dependency manifest does. With this ordering, as long as package.json doesn’t change, the COPY package.json ... and RUN npm install layers are reused from cache, and the build avoids re-running npm install — a relatively expensive step involving network I/O and disk writes — on every build. Compare that to the following naive ordering, where this optimization doesn’t apply:
# Naive order (unoptimized)
FROM node:20-slim
WORKDIR /app
COPY . .
RUN npm install
CMD ["node", "server.js"]
Because COPY . . copies the entire application (including package.json) in one shot, changing even a single line of source code invalidates the COPY . . cache — and, by the cascade rule above, the RUN npm install layer right after it as well. This happens even when not a single dependency actually changed.
Verification: how instruction order changes cache efficiency
Let’s trace, instruction by instruction, what happens to the two Dockerfiles above (naive order / optimized order) when only the contents of app.js are changed by one line and docker build is run again. (As noted above, Docker isn’t available in this environment, so what follows is a trace based on the documented semantics rather than a measured run.)
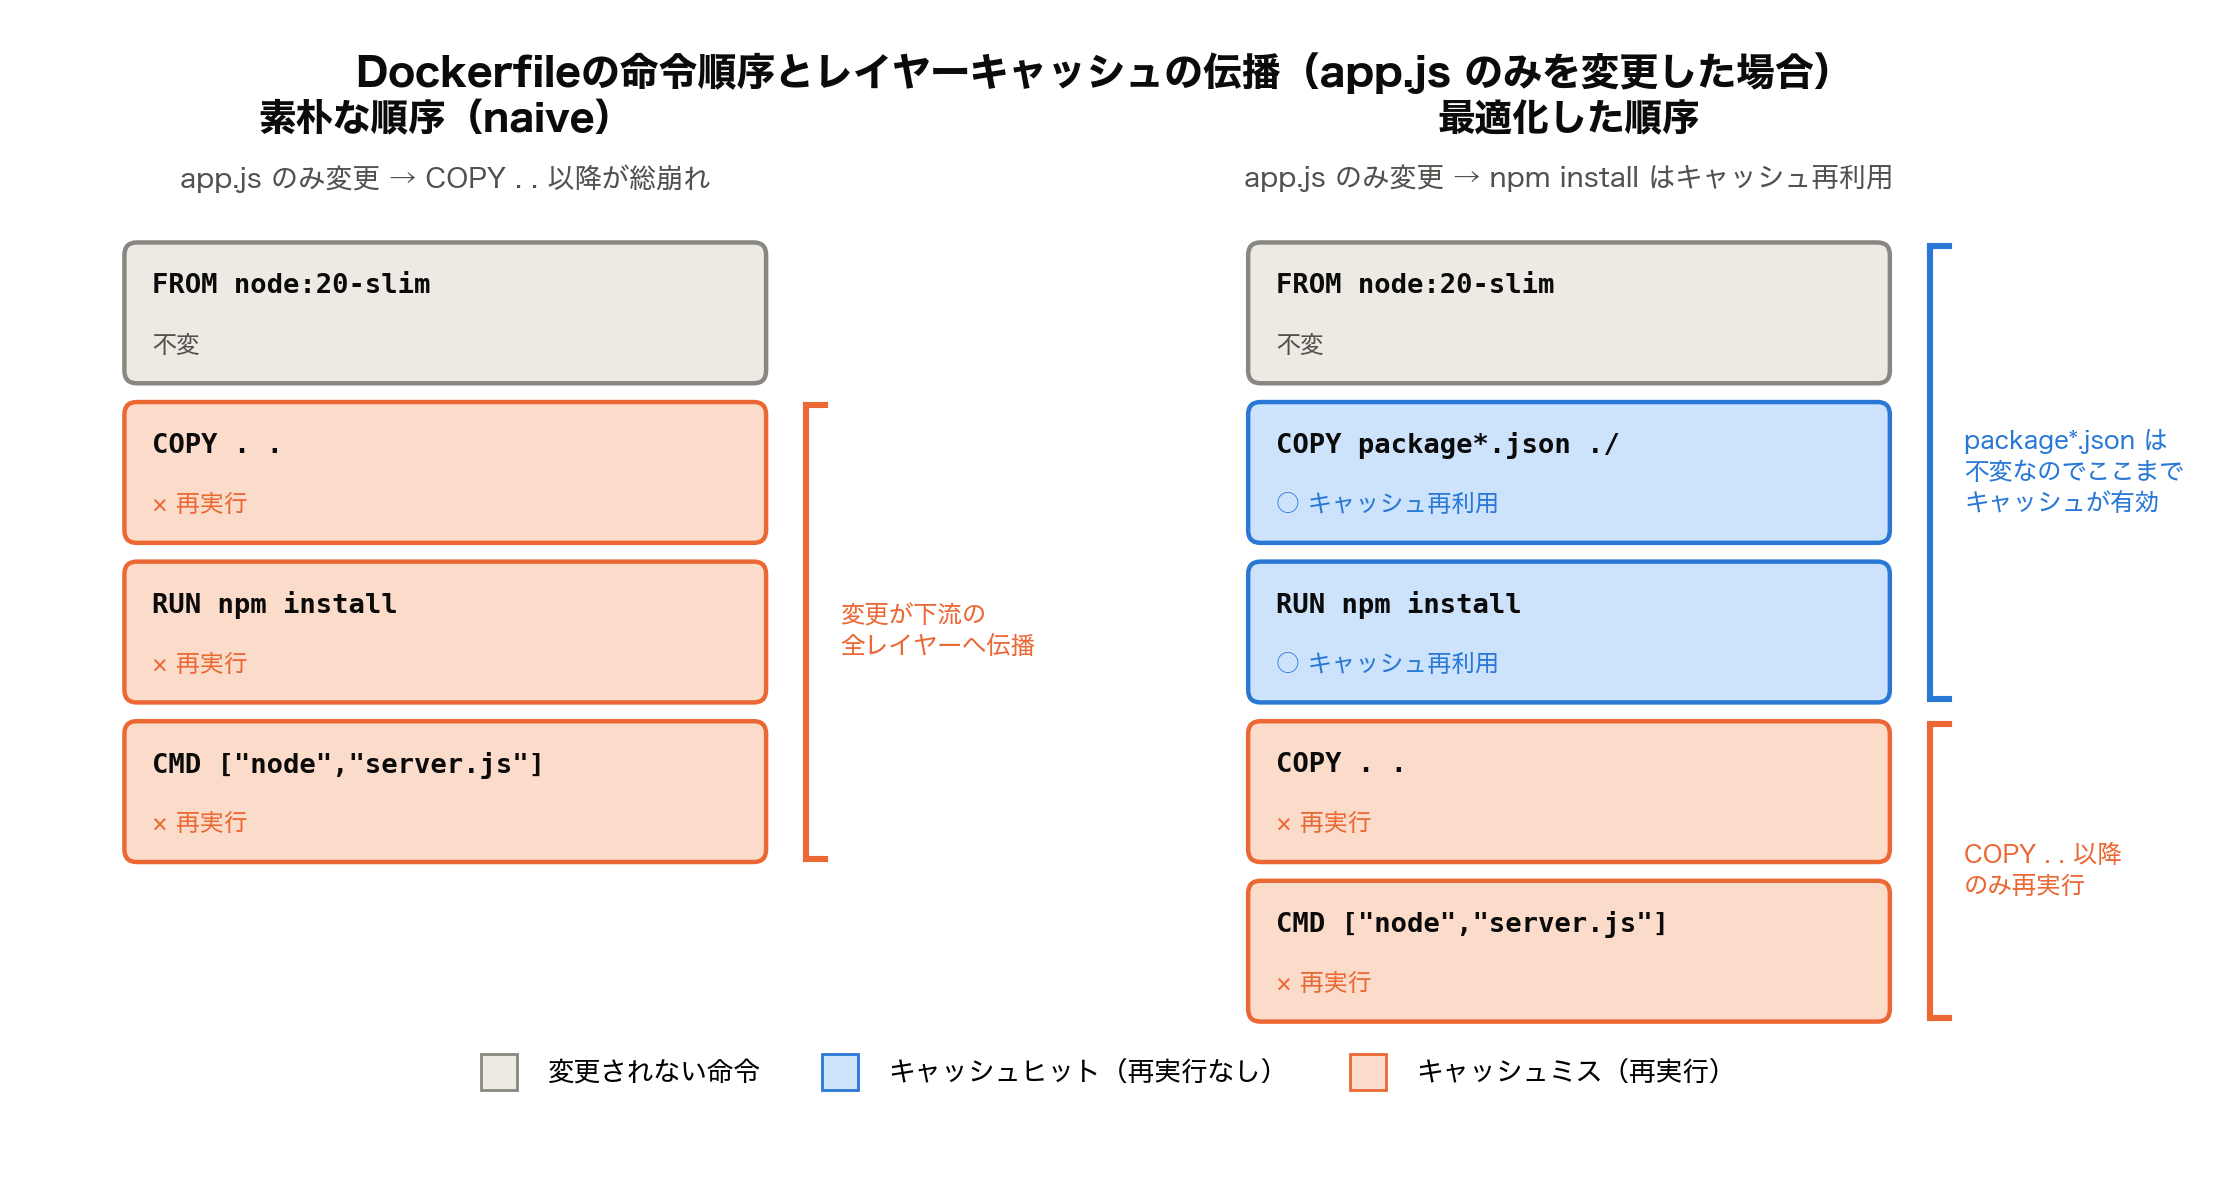
| Instruction | Naive order | Optimized order |
|---|---|---|
FROM node:20-slim | Cache hit (base image unchanged) | Cache hit |
COPY package*.json ./ | (this instruction doesn’t exist) | Cache hit (package.json unchanged) |
RUN npm install | Cache miss (re-run because COPY . . was invalidated upstream) | Cache hit (input package*.json unchanged) |
COPY . . | Cache miss (app.js checksum changed) | Cache miss (same reason) |
CMD [...] | Cache miss (preceding layer was invalidated) | Cache miss (same reason — though CMD is a metadata instruction, so materializing that layer is essentially instantaneous) |
With the optimized order, the build skips the most time-consuming step — installing dependencies — while the naive order re-runs npm install on every single build. For projects with many dependencies, or in CI pipelines, this can amount to a difference of tens of seconds to several minutes per build; the actual time saved depends on network speed, package count, and registry-side caching, so no single generalized figure is claimed here.
On the validity of the Dockerfile syntax
Since there’s no Docker runtime available, the two Dockerfiles above were not actually built for verification. They were, however, checked by eye against the
Dockerfile reference
— the argument shape of each instruction and the ordering constraints between instructions — and no syntax errors were found. In an environment where BuildKit is available, this could be verified mechanically with docker build --check, discussed below.
Shrinking images with multi-stage builds
Packing everything — including toolchains that are only needed at build time, like RUN apt-get install -y build-essential — into a single image leaves compilers and header files that aren’t needed at runtime sitting in the final image, bloating its size. Multi-stage builds solve this by allowing multiple FROM instructions in one Dockerfile. Each FROM starts a new, independent build stage, and COPY --from=<stage name> lets you carry only the artifacts you need from one stage into the next.
Single-stage version
FROM golang:1.25
WORKDIR /src
COPY . .
RUN go build -o /bin/hello .
CMD ["/bin/hello"]
This image retains the entire Go toolchain (the compiler, standard library sources, the module cache, and so on) — none of which is needed at runtime.
Multi-stage version
# Build stage: includes the full toolchain
FROM golang:1.25 AS build
WORKDIR /src
COPY . .
RUN CGO_ENABLED=0 go build -o /bin/hello .

# Runtime stage: only the artifact needed to run
FROM scratch
COPY --from=build /bin/hello /bin/hello
CMD ["/bin/hello"]
AS build names the build stage, and COPY --from=build copies only the single static binary out of it. The final image contains nothing but scratch (a completely empty base image) and the binary — the Go toolchain and source code stay behind in the build stage and never make it into the final image. This structure follows the pattern shown in the
official Docker documentation on multi-stage builds
.
A sense of the image-size difference (not measured in this article — figures quoted from published benchmarks)
Because Docker isn’t available, these two images were not actually built and measured for this article. The figures below are not measurements taken for this article; they are explicitly quoted from third-party published benchmark write-ups.
- The
golangofficial image (which includes the full build toolchain) is reported to weigh roughly 800MB to over 1GB depending on the tag ( Docker Multi-Stage Builds for Go: From 1GB to 12MB Images ). - Extracting the same application into a
scratch-based runtime stage is reported to shrink the final image down to roughly the size of the static binary itself — around 10–40MB for a small CLI tool (same source, and Simple Golang Dockerfile with multi staged builds ).
These numbers vary substantially depending on the base image tag and the application’s dependencies, so if you want to confirm the effect on your own project, the recommended approach is to compare the single-stage and multi-stage image sizes directly with docker images.
docker build -t hello-single -f Dockerfile.single .
docker build -t hello-multi -f Dockerfile.multi .
docker images | grep hello
The same idea applies to interpreted languages like Node.js or Python. Use a dedicated build stage with tsc and devDependencies for TypeScript compilation, and copy only the build output and production dependencies into a minimal runtime-stage base image.
FROM node:20 AS build
WORKDIR /app
COPY package.json package-lock.json ./
RUN npm ci
COPY . .
RUN npm run build

FROM node:20-slim AS runtime
WORKDIR /app
COPY --from=build /app/dist ./dist
COPY --from=build /app/node_modules ./node_modules
COPY package.json ./
CMD ["node", "dist/server.js"]
Building with node:20 (the full variant, which includes the native-module compilation tooling needed to build devDependencies) and running with node:20-slim (a minimal Debian-based variant) that receives only the build output means the final image never contains the TypeScript compiler or devDependencies.
Security: the principle of never running as root
As mentioned in the USER section, processes inside a Docker container run as root (UID 0) by default unless you specify a USER instruction. This isn’t just a matter of style — it directly affects the container’s attack surface.
Why this matters
In the standard configuration — one that doesn’t use user-namespace remapping (--userns-remap and similar) — root inside a container shares the exact same UID 0 as root on the host OS. Under that assumption, running as root carries several risks:
- A wider blast radius on container escape: if an attacker manages to “escape” from the container to the host by exploiting a kernel vulnerability or a bug in the container runtime itself, holding root inside the container makes it far more likely they can also perform root-equivalent operations on the host. Running as a non-root user means the same vulnerability, if exploited, is more likely to be contained within that user’s permissions.
- A wider blast radius on application vulnerabilities: if the application itself has an arbitrary-code-execution vulnerability (for example, a supply-chain attack via a dependency), running as root hands over control of the entire container filesystem and every process in it. Running as non-root limits the damage to whatever that user can read and write.
- Privilege escalation via volume mounts: if a host directory is bind-mounted into the container, files written by root inside the container remain root-owned on the host side too. This creates a risk of unintentionally overwriting host-side configuration files and the like.
Before / after
# before: no USER instruction → stays root
FROM node:20-slim
WORKDIR /app
COPY package.json package-lock.json ./
RUN npm install
COPY . .
CMD ["node", "server.js"]
# after: create a non-root user and switch to it
FROM node:20-slim
WORKDIR /app
COPY package.json package-lock.json ./
RUN npm install
COPY . .
# Create a system user and hand over ownership of the app's files
RUN groupadd --gid 1001 appgroup \
  && useradd --uid 1001 --gid appgroup --shell /bin/false --create-home appuser \
  && chown -R appuser:appgroup /app
USER appuser
CMD ["node", "server.js"]
The official node image actually ships with a general-purpose non-root user named node already set up, so in many cases a single USER node line is all you need. Whenever a base image provides a ready-made unprivileged user, reaching for it is the path of least resistance. If you create your own user, pinning the UID/GID to a fixed value (e.g., 1001) makes the ownership mapping against host-side bind mounts predictable.
One caveat once you add a USER instruction: trying to listen directly on a privileged port below 1024 (e.g., port 80) declared with EXPOSE will fail with a permission error under a non-root user. The usual fix is to listen on an unprivileged port like 8080 inside the container and resolve the mapping from outside with docker run -p 80:8080.
What changed in 2024–2025: docker build –check
BuildKit continues to be actively developed, and there have been several practically relevant changes since 2024. One worth calling out here, since it concerns syntax validation, is docker build --check (
announced on the official Docker blog
in July 2024, shipping with Docker Desktop 4.33).
docker build --check .
Adding --check validates the Dockerfile against the
published list of build-check rules
— consistent casing of stage names, use of deprecated instructions, the recommendation to use the exec form for ENTRYPOINT/CMD, references to files that should be excluded by .dockerignore, and more (21 documented rules at the time of writing) — in under a second, without actually building the image. By default, warnings don’t fail the build, but adding a # check=error=true directive at the top of the Dockerfile makes the build exit with a non-zero status when a check fails, which is useful for catching regressions in CI.
Ideally, the Dockerfile examples in this article would have been validated mechanically with this feature. However, since Docker isn’t available in the environment this article was written in, docker build --check itself could not be run. To be explicit: syntax validity here is limited to the manual, eyeball comparison against the official reference described above.
Separately, late 2024 also brought the docker buildx history command — a subcommand for inspecting and replaying past builds in detail — improving build observability in CI/CD pipelines.
References
- Masaya Aoyama, Kubernetes Complete Guide 2nd Edition , Impress (2021)
- Dockerfile reference | Docker Docs
- Build cache invalidation | Docker Docs - Official documentation on what invalidates a layer’s cache.
- Multi-stage builds | Docker Docs - Official reference for multi-stage builds.
- Build checks | Docker Docs
- The full rule list for
docker build --check. - Introducing Docker Build Checks
- The official Docker blog post announcing
docker build --check(July 2024). - Docker Multi-Stage Builds for Go: From 1GB to 12MB Images - A third-party benchmark of image-size reduction from multi-stage builds for Go.
- Simple Golang Dockerfile with multi staged builds - Same, another third-party benchmark.